I’ve flown Scoot on the Sydney – Singapore route before and wasn’t particularly impressed. This time was no different.
Scoot is a typical low cost carrier who charges extra for everything such as checked in baggage and food. We fly low cost carriers a lot and some do it really well and some don’t. A great example of a good low cost carrier is Norwegian. A bad example is Scoot.
It all starts with checked in baggage which costs $42 (for the purposes of this article all prices are in Singapore/Australian dollars which are essentially the same). If you decide you need more baggage than you originally booked, of course you have to go onto their website and buy more. This is pretty normal. What isn’t normal is that if you don’t make that purchase at least 48 hours before flying, you can’t make it online at all. You have to buy it at the airport and for that they charge $100.
My departure was pushed back 45 minutes from the time stated on my travel itinerary, but I wasn’t informed of that. Again, another issue which was no big deal.
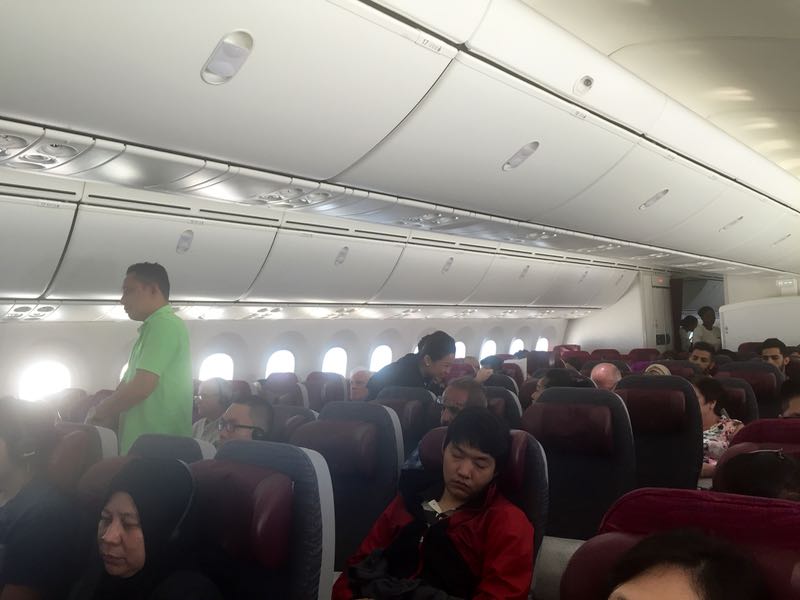
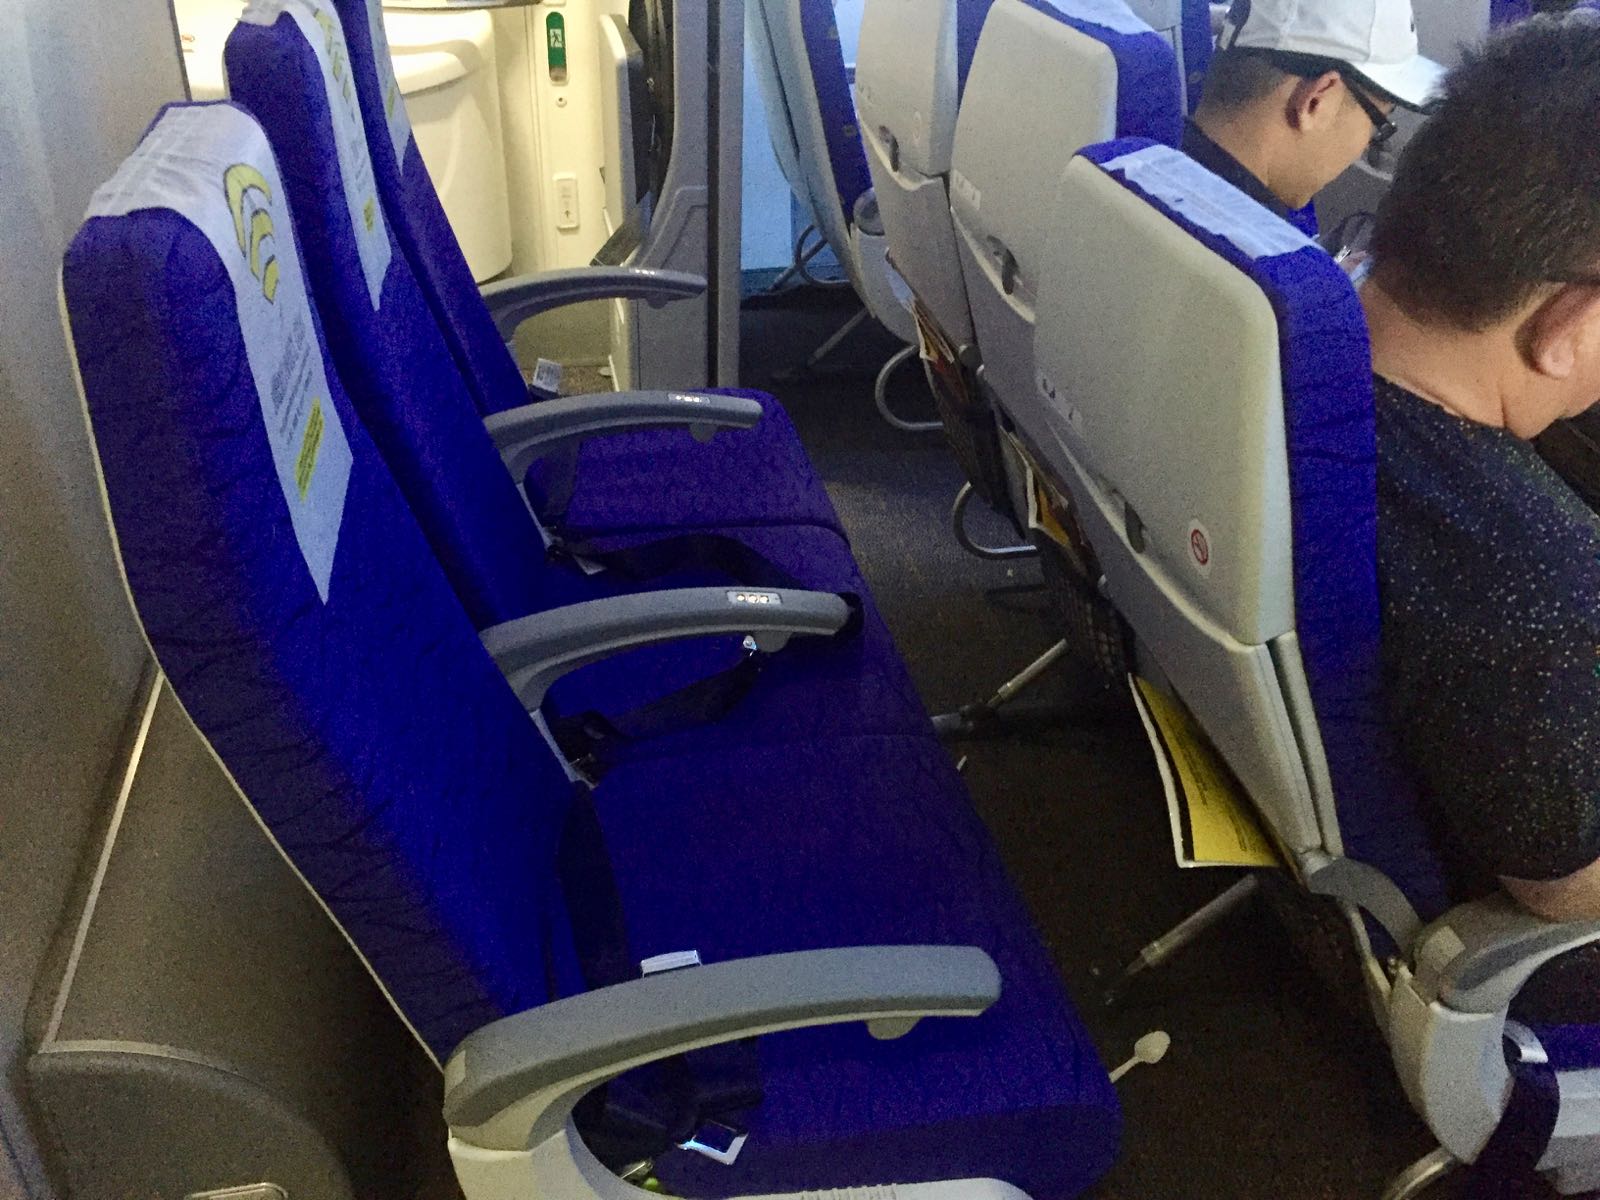
Seating on the plane has to be paid for if you want to sit in a specific spot. Of course almost no one pays for this because you generally always get to sit together with you travel companions anyway. What you can’t predict is who else is going to be seated next you. And on this flight I encountered a nightmare situation. My seat was surround by kids and one group in particular were just atrocious. When you fly full service you often get groups of kids near the bulkhead, but on this scoot flight they seemed to be scattered around everywhere. It was truly awful.
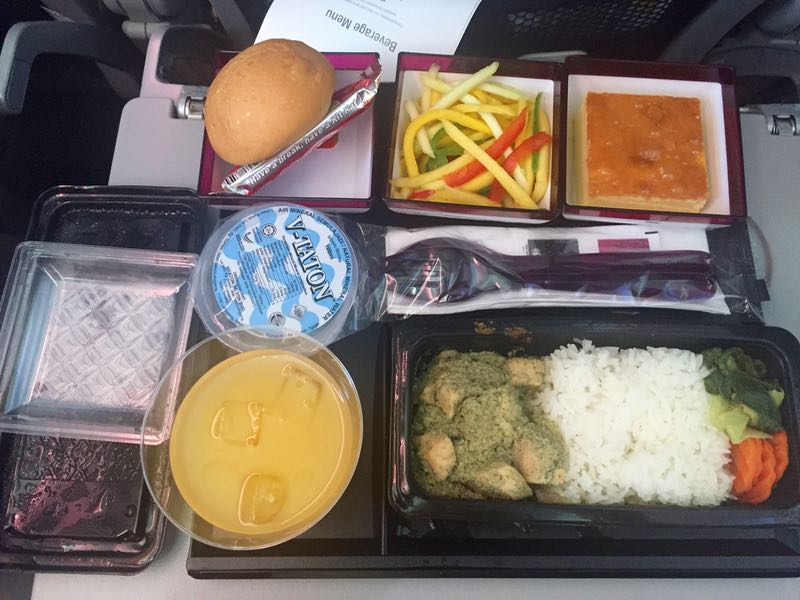
Food on the flight was expensive. Main meals run at between $12 & $15 and are small. A slim can of coke (250ml??) costs $4, a tiny water (330ml) costs $4 and a beer $8. Which brings me to my next point.
You can’t do this 7h 30m without some form of sustenance. It’s just too long. But Scoot have a policy of forbidding you to eat or drink anything on board that you haven’t bought from them. It’s outrageous and means that you’re guaranteed to spend at least $8 on 2 bottles of small water and perhaps $5 for a cup of noodles and $12 for a tray of brownness.
In my experience, you can sneak food on board and eat it, although I didn’t see anyone else doing this. I did, however, see lots of people bring water from outside. It’s $3.50 (660ml) at McDonald’s before you board the plane.
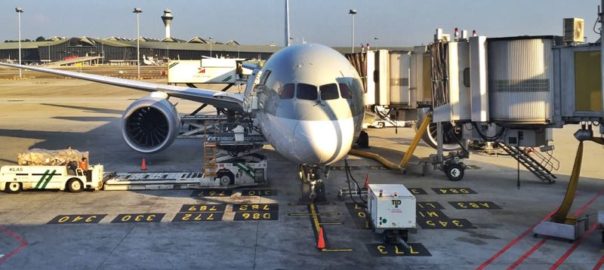
The TZ1 flight was on a new Boeing 787 Dreamliner. These are nice planes, but as I’ve said before, airlines love to fit them out in a 3-3-3 configuration and 2 men sitting side by side will generally be touching shoulders for the whole flight. And forget about using the armrest because it is so narrow.
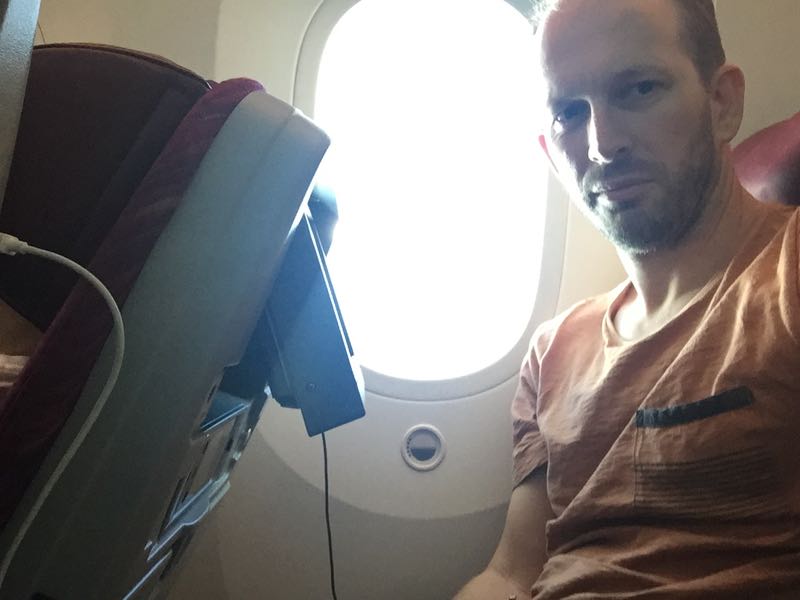
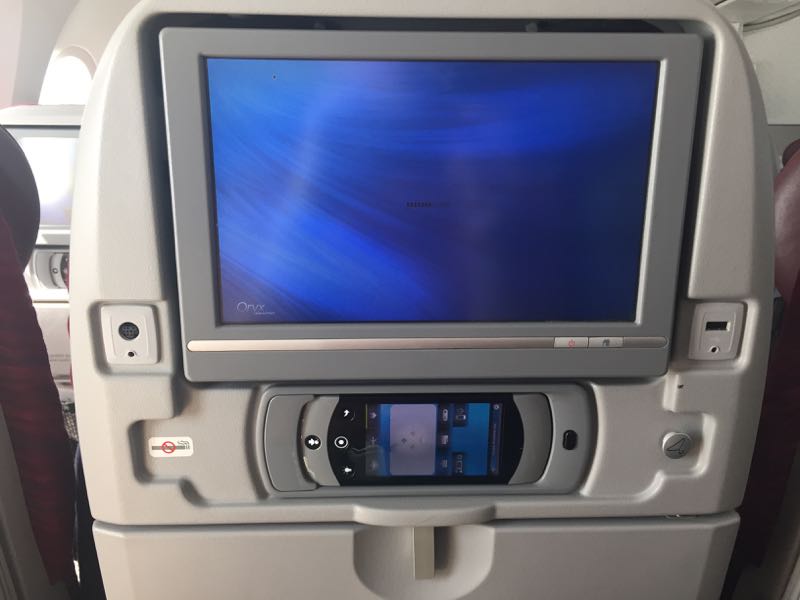
The seats on this Scoot flight were OK. Again, they were those cheap slimline seats which are fine over the course of 3 hours, but after 7 hours really get a bit old. There are no TVs in the backs of seats although I did see an advertisement for renting portable sets. Wifi is available on board at predictably exorbitant prices.
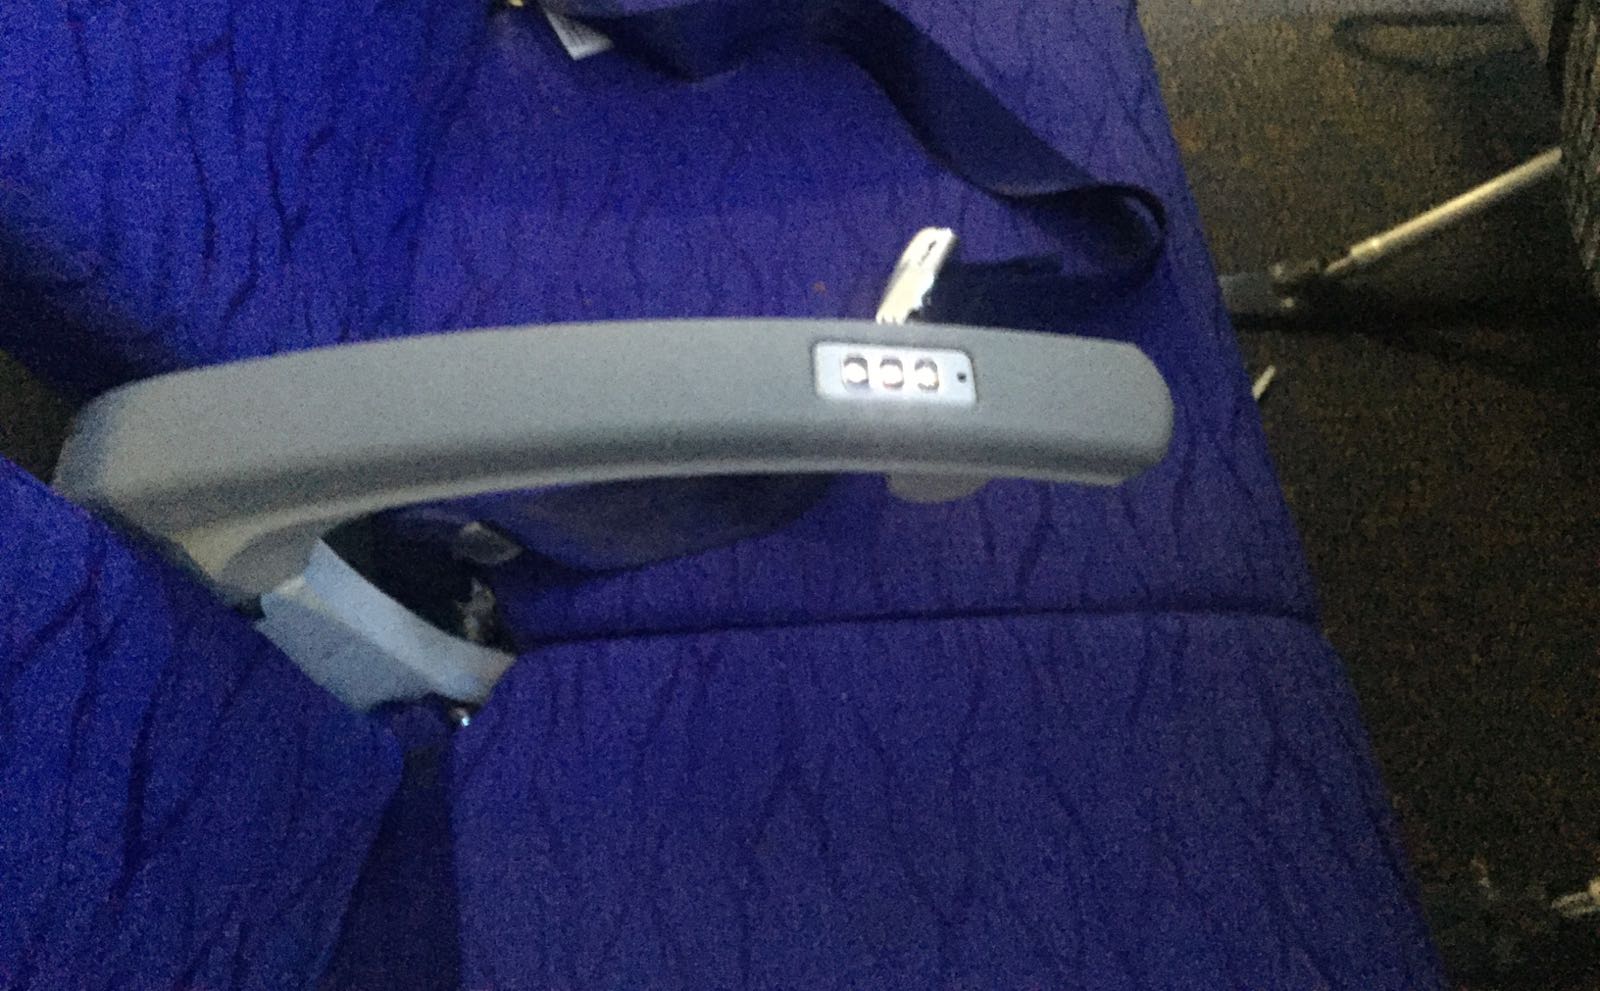
A really frustrating point about the seats, though, are the call and light buttons. They are exactly where you put your arm on the armrest. And you will forever by ringing the service bell, turning the light on, turning it off… And the whole cabin is doing it too throughout the whole flight. Constantly. It means the hosties are running up and down the aisle constantly attending to calls which are false alarms. Such a simple thing which causes all sorts of hassles for both staff and passengers.
One thing which really shits me? They charge you $5 to use the power sockets beneath your chair. What a cynical grab for extra cash. I reckon they’d probably earn $100 per flight from this revenue source at the expense of inconveniencing 200 other people. Massive thumbs down on that.
All up, if you opt for some of the extras like checked in baggage and a bit of food, your flight quickly balloons from $199 one way to something in the order of $275 which is not that cheap. It’s cheaper than any full service carrier, but it’s nowhere near as cheap as what the headline price appears to be.
Of course, this is the business model of low cost carriers, but Scoot manage to extract just that little bit more out of you. For me, they’re in the worst category of low cost carrier and in the same realms as Ryan Air. A Complete bag of shite.
All in all, an OK option if you’re flying from Sydney to Singapore. But if I have a choice again, I’ll be willing to pay an extra $100-$150 on another airline rather than put up with Scoot. Not sure how realistic that is, but seriously. Scoot is at the bottom of the pile now.
It’s been a while since I’ve written about my travels in Indonesia, despite having travelled to quite a few places over the past couple of years.
A couple of weeks ago I was invited (by the South Sumatra tourism people) to visit a place in Sumatra that I’d never previously heard of — Pagar Alam in South Sumatra. Apparently Pagar Alam has been identified by the Indonesian Ministry of Tourism as one of 88 places in Indonesia to be developed for tourism purposes.
Now, we can debate the pros and cons of pumping money into micro-projects versus tackling the strategic/macro issues (such as country-wide infrastructure, visas and inter-ministry coordination to ensure a friendly tourism environment), but I can say that Pagar Alam is a worthy location for some of these funds.
In other words, the Indonesian Ministry of Tourism needs to work more as a coordinating authority to ensure that all the ingredients which make a destination favourable to tourism are the best they can be (many of which are managed by other ministries). But that’s an issue to discuss in another post.
Where is Pagar Alam?
Pagar Alam is located 280km and about 8 hours from Palembang and 169km and about 5 hours from Bengkulu by vehicle. Most people will access Pagar Alam either overland from other parts of Sumatra as part of a big trip through Sumatra or by flying to Lubuk Linggau from Jakarta and then catching public transport for 4 hours. (or hire a car and driver at the airport — there are lots of them and they will find you!)
TransNusa also flys directly between Pagar Alam and Jakarta on Tuesdays and Saturdays for a price of around Rp700,000. But it’s quite difficult to book these tickets online. Try emailing these email addresses for more info:
It actually makes sense to come to Pagar Alam if you are on a big trans Sumatra trip because it breaks up the journey nicely between Padang or Bengkulu and Bandar Lampung.
Climate of Pagar Alam
When you get here, you’ll find a stunning town located 700m above sea level on the slopes of Gunung Dempo. The climate is perfect. I really loved that night time temperatures were cool and day time temperatures moderately warm. Nothing like some of the lowland areas of Sumatra which can be stifling.
Make sure you bring some wet weather gear as it rained every afternoon I was there.
Things to do in Pagar Alam
I actually like Pagar Alam as a place to just relax and cruise around checking out the local way of life. But it also has some solid things to do as well such as:
The best idea is to rent a motorbike to get around on, but if you’re not interested in riding a motorbike, there are plenty of cars and drivers available from the hotels.
Where to Stay
I stayed at the best hotel in town, Besh Hotel. They have a bunch of accommodation options ranging from standard rooms to large multi-room villas. The hotel is located right on the edge of the tea plantation and it’s an awesome place for photos, especially in the early morning. Check it here on Traveloka.
Unfortunately, no other hotels are listed on any of the big booking websites. But the following hotels can be contacted directly:
Garuda ZZ Hotel – +62 730 622177
Mirasa Hotel (recommended by Lonely Planet) – +62 730 621266
Dharma Karya Hotel – +62 730 621297
Pagar Alam reminded me of one of the great things about Indonesia. There is always one more place to visit. You’ll never get bored of travelling here, no matter how long you’ve been travelling for. No matter how much you think you know about the place.
It’ll be interesting to see how the tourism scene in Pagar Alam develops over the next decade. With the right sort of investment in infrastructure throughout Indonesia, we should see places like Pagar Alam flourish. At this point, it’s still virtually untouched.
I’m a big fan of Pagar Alam. It’s a wonderful place to recharge before heading onto your next destination.
What an incredible experience we’ve just had in Torres del Paine National Park. We just completed the W trek in June/July and just had to share our experience.
Preparation
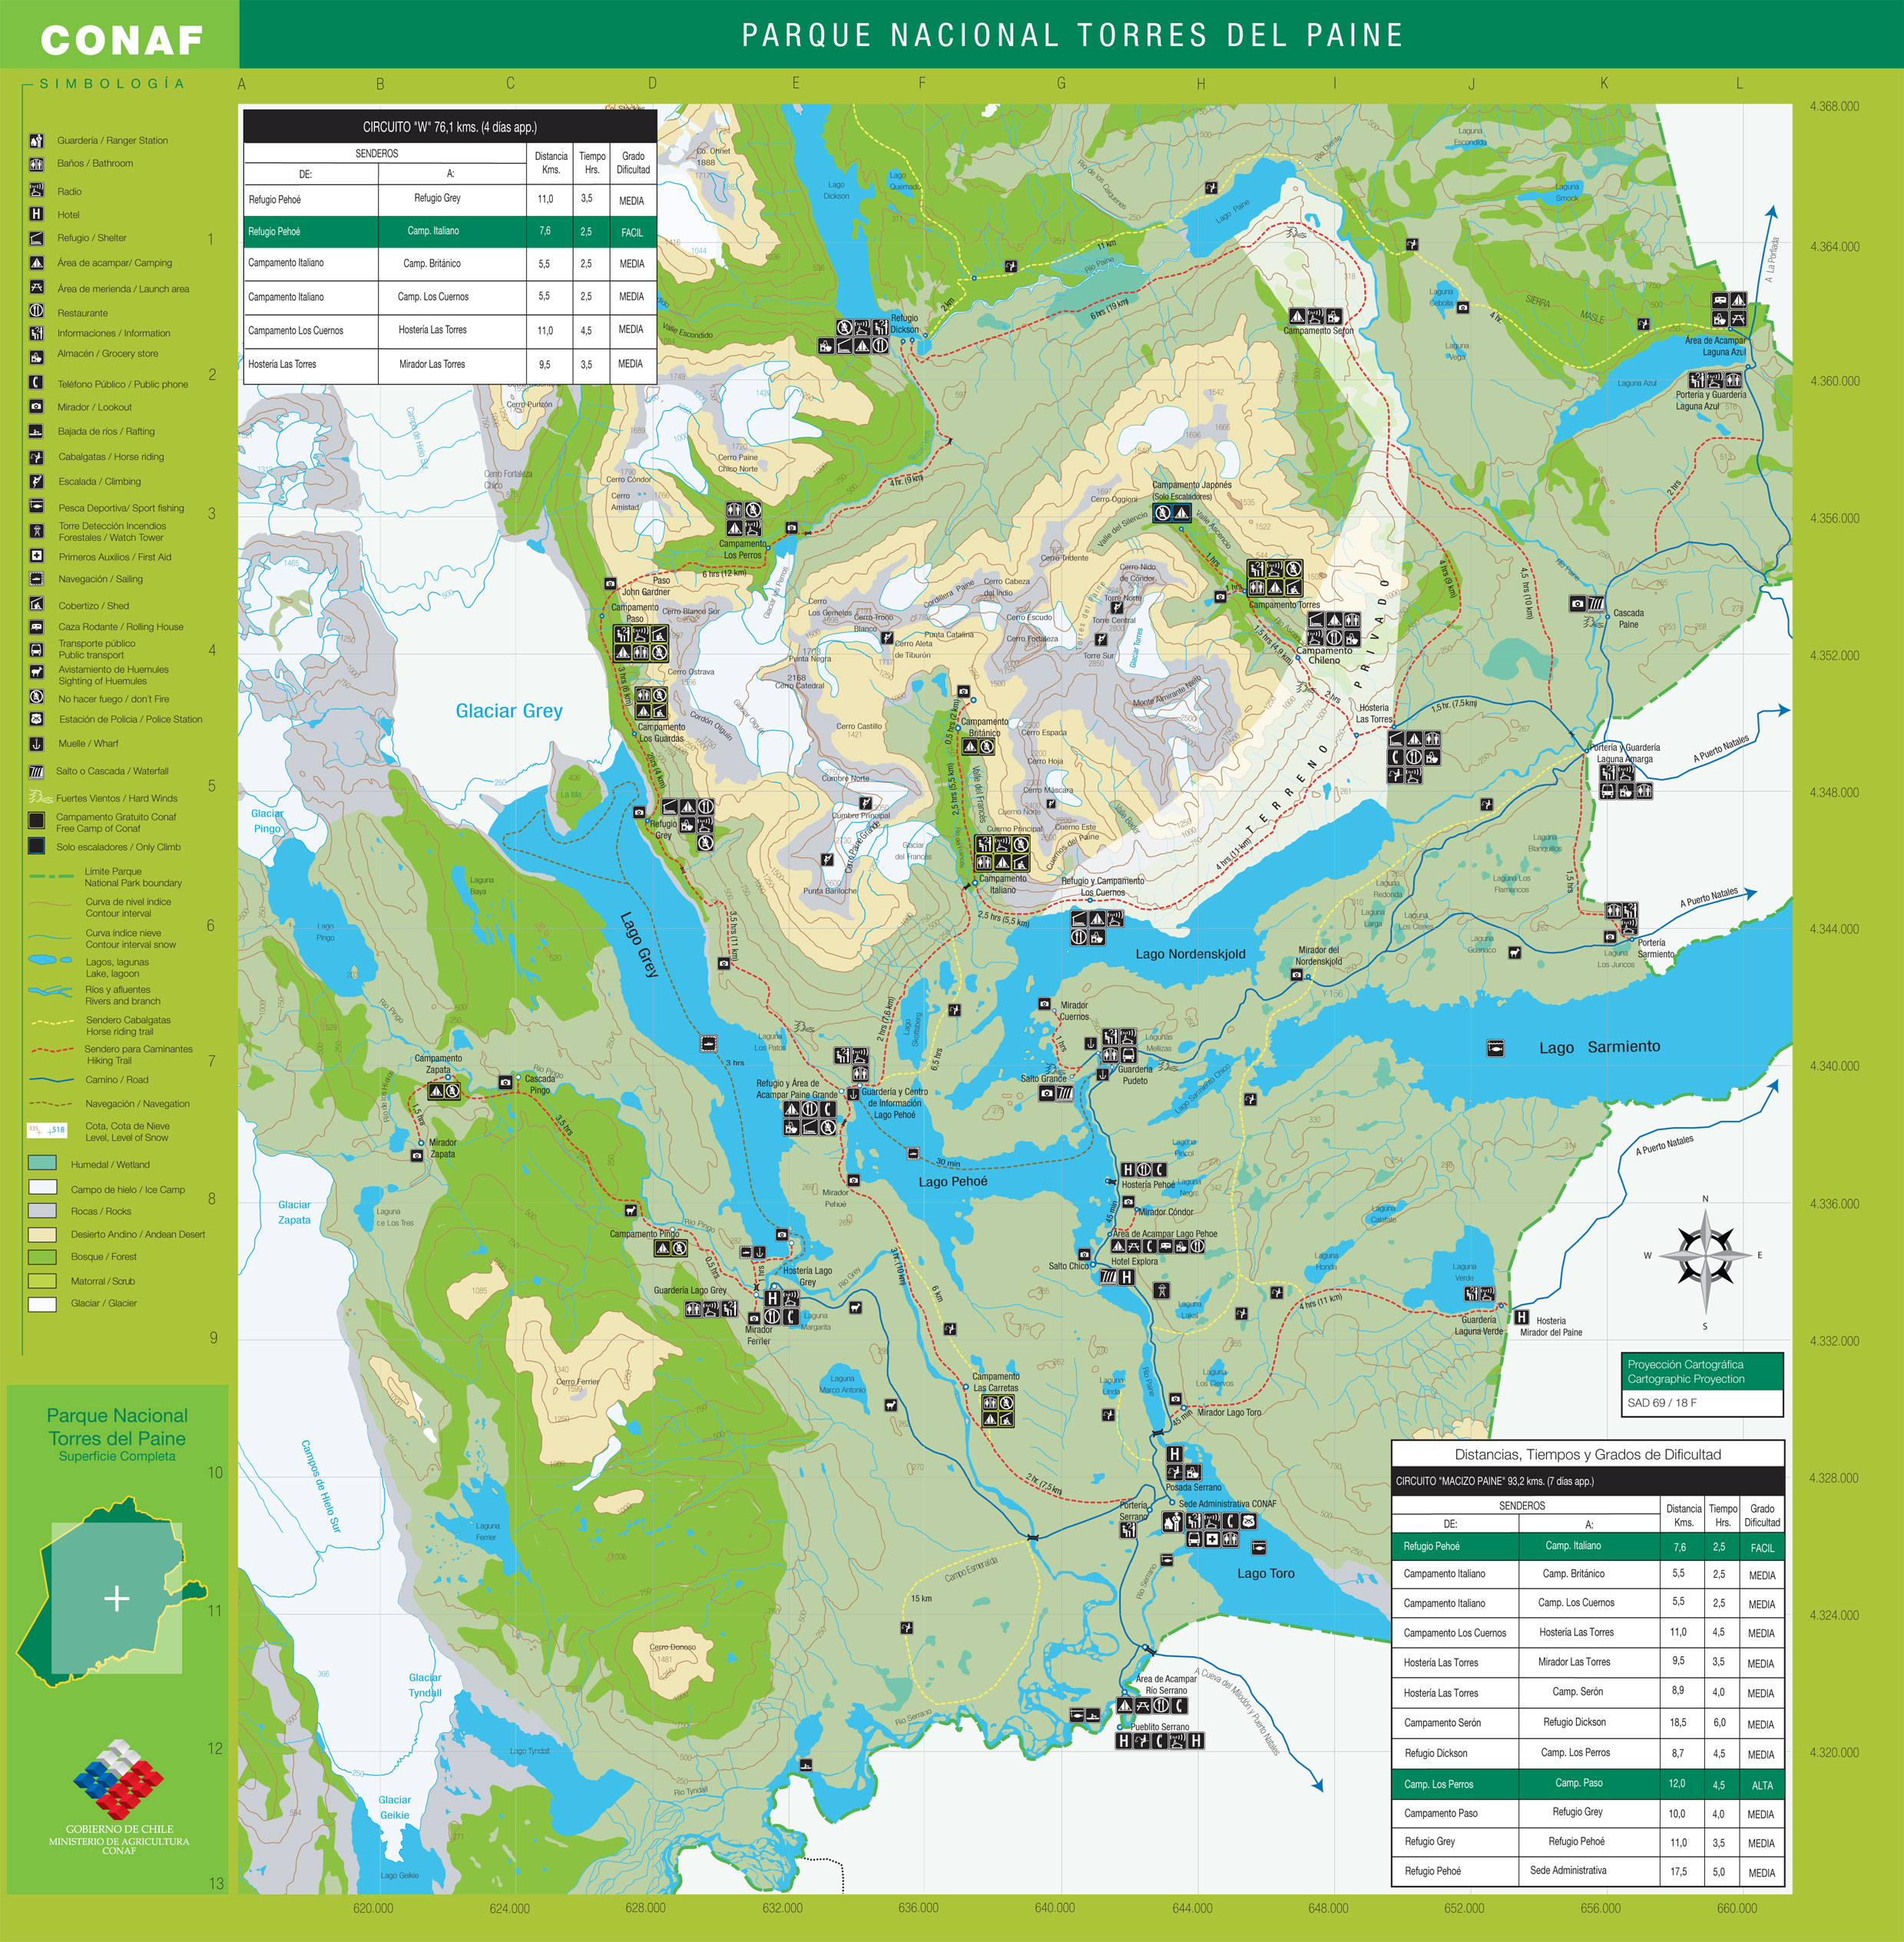
In preparation for the 5 day trek in Torres del Paine National Park, we did some shopping, booked our campsite and rented our camping gear.We bought a lot of food for this trek and it ended up being way way too much. For some unknown reason, we just didn’t eat as much as we normally would and we brought too much emergency food. This weighed us down a lot!
We had heard that you get a discount on your camping if you book in advance rather than just showing up, so we found the Vertice office in Puerto Natales and booked our Paine Grande campsite there for a 50% discount.
Finding the right place to rent camping gear is a bit of a challenge. Who do you trust? What is a good price? We just didn’t know. Luckily, we attended the awesome 3 o’clock briefing which happens daily at the Erratic Rock hostel. From our discussions with them, it became clear that we trusted them and would be happy to rent from them despite them being a little more expensive than others. Here is a list of what we rented:
Tent
Sleeping bags
Cooking pot
Portable stove
Cups
Plates
Cutlery
Trekking poles (one each)
Sleeping mats
All up, it cost a whopping 105,000 CLP for 5 days. But you can’t go there with the appropriate camping gear. So you have no choice.
Day 1
The bus to Torres del Paine leaves at 7am from the bus terminal in Peurto Natales. We used Maria Jose bus company because there were no other companies running services due to winter. At other times of year there are lots of different bus companies operating the route and you must not choose Maria Jose for reasons which we list on day 5 below.We arrived at Administration because the catamaran wasn’t operating due to the winter close down. This means you have to trek 5 hours from Administration to Paine Grande instead of catching the boat. This effectively means that day one has to be as we did it whereas in summer you can choose between catamaran and walking. We registered in administration and set off walking.Within 10 minutes it started raining lightly. Within half an hour it was really windy. Actually windier than I’ve ever experienced before so we could guess it was gusting well over 100km/h. This wind combined with the rain combined with a temperature of about 2°C was awful. Our pants were immediately soaked and our legs like blocks of ice. But we had to keep walking in that incredible headwind even as it almost blew us over numerous times.
We finally made it to Camp Las Carretas and had a sandwich. We knew time was tight so we headed off after about 15 minutes back into the awful weather. We were lucky to have about an hour of no rain and because it was so windy, our clothes dried out. Unlucky for me, my shoes were complete waterlogged despite them being water proof. Nothing is going to stop rain like that.
3km out of Paine Grande there is a sign describing the lake and how far you have to go. From this point on, the weather got worse and as the wind grew stronger, the the temperature dropped and it started snowing. It was awful. I love extreme weather, but the conditions were so much worse than I expected. We also didn’t have clothes which were suitable for those conditions. You really do need water proof, wind proof pants. And you need a good warm water proof jacket instead of raincoats. I felt likes Scott of the Antarctic. It is so so so much worse than any other weather I have been in.
It was pretty dark as we clambered over the rocks into Paine Grande. We were supposed to camp there that night, but we immediately upgraded to a dorm room. Best decision ever.
The fires were lit in Paine Grande and the 10 or so other people there kept us company. Only a few others had actually been out in that weather and all agreed it was just incredible.
Day 2
At this point, I wanted to go home. Day 1 was so extremely difficult that I truly believed it was impossible for us to carry on. But the weather cleared on day 2 and the sky was blue.We decided to walk up to Mirador Glacier Grey, a 4 hour round trip. The wind was strong again, but because there was no rain and we weren’t carrying our big packs, it was really easy to do and a perfect tonic for the previous day’s misery.
Day 3
We set off a good hour before sunrise just as it was light enough to see the ground without a headlamp. I used the headlamp anyway and we made good progress with our heavy packs towards Italiano. We reached Italiano within about 2 hours and left our main packs there. Our plan was to visit the mirador in the French Valley. We didn’t know it at the time, but the mirador is only 500m from Italiano. We actually walked for an hour up the valley and got a better view of the glaciers. We saw lots of mini avalanches and one massive one that boomed through the valley. Simply awe-inspiring.From there we headed back to Italiano, ate some lunch and progressed onto Cuernos. I’d never set up a tent on a wooden platform before, so that was a learning experience. I just did what everyone else before me had done and placed big rocks inside the tent in the corners to keep it from flying away. It wasn’t that windy there anyway.
Going to the toilet in the bush was a bit awkward. You could see that people had just been crapping everywhere and of course we had to do the same. When it’s dark, it’s not a pleasant experience.
That night it got bitterly cold. Susan slept like a champion for most of the night but I woke up at 2am and couldn’t sleep much after that because I was so cold. The best advice we received before doing the trek was to fill a Nalgene bottle with boiling water before going to bed. I didn’t do that and suffered because of it. My feet had two pairs of thick woollen socks on them and they were still cold. I think a decent thick sleeping bag liner is absolutely necessary for those cold nights as well as a hot bottle of water. Our -9ºC sleeping bags just weren’t good enough on their own.
Day 4
The next day we started our hike up to camping Las Torres. It was a long, but pretty uneventful walk as we passed Chileno and into the snow. The path became quite icy and there was snow everywhere.At this point we stopped and talked about our plan. It seemed that we wouldn’t have enough time that day to reach the towers because we were running out of light. We also knew we wouldn’t be able to wake up the next morning, hike to the towers and then all the way back down to Amarga to catch the bus. In the end, we decided to descend out of the snow and back to Chileno.
And that’s when the weather turned sour again. The wind whipped right up, the temperature dropped and it started raining. It was absolutely freezing as we set up the tent on one of those wooden platforms. Luckily for us, we spied a locked up toilet attached to the closed accommodation block, removed the grill and went inside to the toilet. After 5 minutes in there out of the wind, we knew we had to move the tent into the toilet.
After we had set up the tent in the toilet, the lights suddenly came on. We knew that meant someone else was there. We were scared we’d get into trouble for being in the toilet, but we had no choice to announce ourselves. I found the chef who was for some reason sleeping there and asked if it was ok to be in the toilet. He was fine with it!
After we’d cooked dinner in the toilet block, it began to get colder and colder. It almost felt colder in there than outside because of all the tin everywhere.Susan hunted down the chef again and asked if we could come inside. He instead opened up his kitchen for us, turned on the gas stove and gave us access to water. Within a couple of hours it was reasonably warm in there to the point we could take our jackets off. Big thanks to the chef at Chileno.
Day 5
We were bummed at having missed out on seeing Torres del Paine. It’s what everyone goes to see. But the weather was bad the next morning and for the next few days after that and the towers were not observable. And that’s the way it is there. The weather can change in a second and your dream of seeing the towers can be taken away from you. Be prepared for that.We commenced our trek down from Chileno to Laguna Amarga which was quite muddy by this time.
Still, we kept a good pace, ruined our knees and arrived at the ranger station at Laguna Amarga with half an hour to spare. When all of a sudden a ranger appeared with bad news.
The bus company Maria Jose had decided to cancel their bus service for the rest of winter and anyone left in the park would have to find their own way home. With no public buses, we were going to have to hitchhike. And with hardly anyone in the park, that was going to be almost impossible.
The ranger was so so awesome and sympathetic and offered to flag down every vehicle which passed which was about 2 in 2 hours and one of those was stopping because he had a flat tyre.
But miraculously a bus full of off-season resort workers were heading back to Puerto Natales. So we jumped on that and were back in a warm hotel in no time. The ranger had anticipated we would have to camp their for a few days before anyone came past on their way to Puerto Natales.
Day 6
This is a post script to the issue with Maria Jose. In the morning I went to get my money back from them because I’d already bought a return ticket. I’d paid an extraordinary 30,000 CLP per person for return tickets and wanted half the money back. It was the least they could do for leaving us stranded out there, right?
Wrong.
I tracked the owner of the bus down in her hostel in town. I walked into the kitchen area and she was immediately hostile telling me to get out. It was a poor start, so I waved my ticket around and demanded a refund. After much shouting, she came back to me with 20,000. She’d short changed me by 10,000. So I followed her back to the kitchen and demanded the full 50% refund and she wasn’t having it.
She was trying to get back into the kitchen to lock me out so I couldn’t talk to her. So I stood in the doorway and she called the police. And then locked me inside the kitchen while we waited for them. She called the police twice and put on this fake cry, as if she were being robbed or assaulted! It was outrageous!
Anyway, the police arrive, Susan was bewildered and we were escorted outside to the police car. They took us downtown to another hostel (thank god) where a hostel owner with great English explained everything.
He explained that Maria Jose is a hostel popular with young Israelis who are on a cheap holiday. It’s extremely cheap, it has a terrible reputation and you should never use their bus service as there are always problems. Everyone shook hands and the police left and we went and had pizza. We never did get our half-refund.
An awesome winter Torres del Paine experience. It’s totally doable, but you must be prepared for hardship.
Here is a little video of the expedition (minus the hard parts):
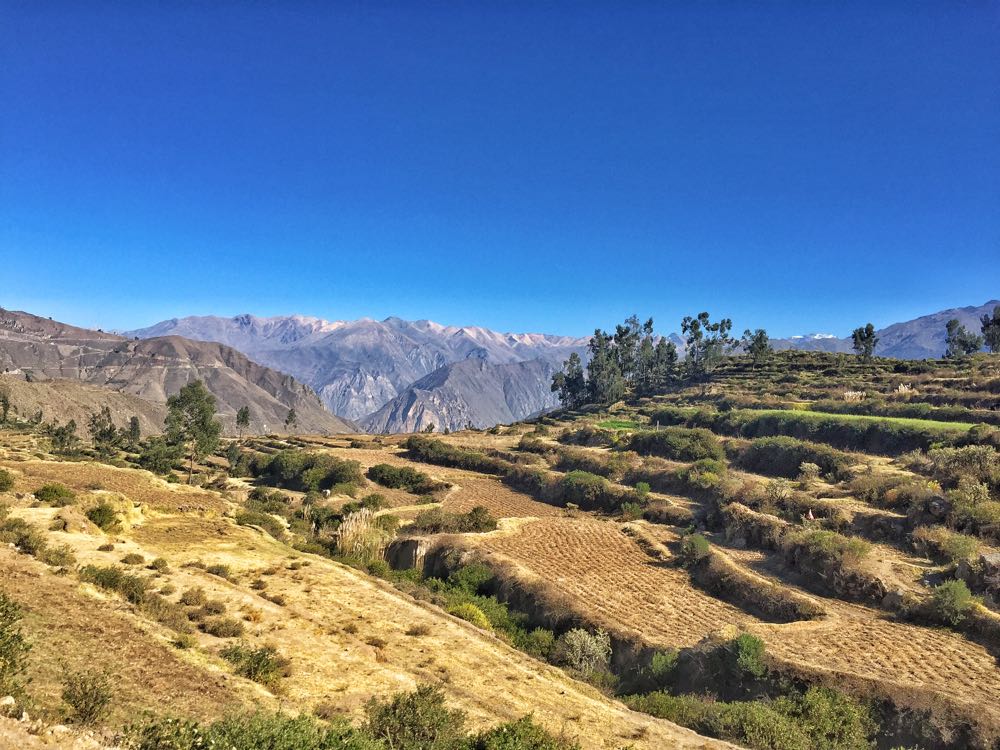
Located about 6 hours from Arequipa in the south of Peru, Colca Canyon is one of the deepest canyons in the world with the sides of the valley reaching 1000m above the river below. Within the canyon are a number of small villages, many of which are only accessible on foot which makes for a great adventure if you’re willing to hike into the canyon in order to stay overnight in one of the villages.
Orientation
The jumping off point for the Colca Canyon is the small town of Cabanaconde which is located at the top of the cliff overlooking the canyon below — it’s a 6 hour drive from Arequipa and is accessible by regular public bus. All the towns in the Colca Canyon are on the opposite side of the canyon from Cabanaconde meaning if you want to visit them, you are going to have to hike down to the river and back up to your chosen village.
What are the options for trekking in Colca Canyon?
There are 2 main options for trekking the Colca Canyon. On your own or with a tour. If you take a tour from Arequipa, you will be given the option of 1 or 2 nights with costs ranging greatly, but nothing coming close to as cheap as doing it independently. Most people we saw in the Colca Canyon were on a tour, but we think it is unnecessary and too restrictive.So the second option is to do it all in your own. When you visit the Colca Canyon independently, you allow yourself to pick and choose the villages to visit based on what you want to see, how tired you are and other recommendations you might get while on the trail. It is slightly cheaper to do it independently, but the freedom you get is by far the biggest benefit. And honestly, it is not complicated to do on your own. The main thing people worry about is how to get to Colca Canyon.
How to get to Colca Canyon from Arequipa
The first thing you need to do is get a taxi from your guesthouse in Arequipa to the main bus station. There is only one bus station and it’s the same bus station as you arrived to Arequipa in. The cost of a taxi should be 7 soles, but this can vary depending on the type of car and the time of day.Buses at the time of writing depart Arequipa for Cabanaconde at 1am, 3:30am, 9:30am, 11am, 3pm and 7pm. The journey takes 6 hours, so you need to select a bus that will get you to Cabanaconde at a time that is suitable for you. If you want to trek immediately after arriving like we did, you have to catch the 3:30am bus because the 9:30am bus arrives too late to be able to trek to the bottom of the valley before it gets dark. We met a lot of people who caught the bus from Arequipa and stayed overnight in Cabanaconde first and this is a good idea if you have a lot of time.
The cost of the bus from Arequipa to Cabanaconde is 17 soles and there are multiple bus companies running along the route including Reyna, Andalucia & Señor de los Milagros.
What are the most popular routes?
Most people who trek independently in the Colca Canyon choose to trek for 3 days and 2 nights. The most popular villages for tour groups are San Juan and the oasis town of Sangalle, so you might want to skip those (although we really enjoyed San Juan). Most of the independent travellers we met decided to trek from Cabanaconde to Llahuar, which takes about 4 hours and is straight down the side of the valley. It’s brutal. At Llahuar there are 2 choices for accommodation. Virginia’s or Llahuar Lodge which are essentially the same price — 20 soles per person (only 15 at Virigina’s if you don’t use the hot springs). We stayed at Llahuar Lodge, but the food was awful so we’d recommend Virginia’s. The main reason independent trekkers come to Llahuar is to bathe in the hot springs. The springs are located right next to the raging river and are an awesome way to relax your stiff and tired muscles at the end of the day.After Llahuar, most trekkers we met either tried to go to Fure, an abandoned village with no guarantee of accommodation or the oasis town of Sangalle. Some people we met did trek all the way to Tapay as well and we think this is a great idea because Tapay doesn’t get so many visitors. It’s a long trek to Tapay from Llahuar, so allow about 8 hours inclusive of a stop for lunch at Malata. San Juan is 7 hours or slightly less if you’re fast. Sangalle is 5 hours or slightly less if you’re fast, but doesn’t include a stop for lunch because you actually bypass Malata.
Wherever you end up on night two, you have a hell of a hike up the mountain back to Cabanaconde. Either from San Juan or Sangalle, it’s up up up! If you’re coming from Tapay or Malata, it’s obviously even more difficult because you have to come down from a high elevation first before climbing up again. Allow at least 5 hours of punishment for this.
There are so many more options for trekking around the canyon and that’s the beauty of doing it independently. Make sure you grab a map at the tourist office in Arequipa and always have at least 2 litres of water per person at all times. Seriously. It can be brutally hot and you will be sweating profusely. Minimum of 2 litres!
The route we took
We caught the 3:30am bus from Arequipa and arrived at Cabanaconde at 9:30am. We had some breakfast at a local eatery and began to walk to Mirador San Miguel which is the starting point for the descent to San Juan. Unfortunately we took a wrong turn. We were supposed to follow the main road to Arequipa until the mirador, but we decided to take a short cut through the farms… Bad idea. We ended up taking one and a half hours climbing a massive hill filled with terraces before we got to the mirador. By the time we got there, we were so so tired and we hadn’t even started the trek.
From the mirador we took 5 hours to reach San Juan when most things we’d read say it takes 3 hours. We did walk quite slowly, but it was incredibly hot and we easily drank 4 litres of water between us. The final small ascent to Posada Roy was punishing.
Posada Roy was amazing. The rooms we got had private hot water bathrooms and only cost 20 soles each. We could have got simpler rooms for 10 soles each. Dinner was 15 soles each and so so delicious. Chicken, soup, rice, dessert… Breakfast was 10 soles and consisted of pancakes and coffee. Water at Posada Roy is a rip off at 7 soles per litre. You’ll have no choice but to buy it there unless you are biggest tight arse going and you cart down an extra 5 litres from Cabanaconde to save a few soles. Just buy it at Roy’s and grit your teeth.From Roy’s (9am) we climbed for a couple of hours up to Cosñirhua and then along the flat road to Malata (11:13am) where we ate a fantastic but simple lunch at a random shop. At 12pm we continued our walk towards Llahuar and we basically didn’t stop walking for the next 4 hours until 4pm. In all it took us 7 hours from San Juan to Llahuar and it was honestly quite brutal. Lots of uphill at the start and lots of downhill at the end. The middle section was only a slight uphill, but it was in the blistering sun, so it just sapped all our energy. Thankfully the hot springs at Llahuar were totally worth it.
We stayed at Llahuar Lodge for 20 pesos per person which included a shared ice cold water bathroom and access to the hot springs down near the river. Dinner was 10 soles per person and was honestly very disappointing. Probably our least favourite meal in Peru, not that we’ve been too enamoured with the food in Peru anyway. Breakfast the next morning was 2 barely edible slabs of half cooked dough resembling pancakes. Really poor. There is one other accommodation option in Llahuar called Viriginia’s and we’d try that next time.
The next morning we slept in and instead of hiking up out of the canyon, we joined a couple of French girls we met and hiked up to the main road and waited for a bus. Yes! There is one bus per day which swings past the Llahuar turnoff at 12pm and costs 10 soles to Cabanaconde. The journey in itself is an awesome experience along an extremely narrow road which winds its way out of the canyon. Even though it sounds like a wimpy option (it is), it’s an option which gives you a different perspective of the canyon and a different adventure. I’d definitely do this again next time.
The bus will get you to Cabanaconde just in time to catch the 2pm Reyna bus back to Arequipa. There is also a bus at 1pm if you decide to walk up earlier.
What you need to bring
The key to trekking in the Colca Canyon is bringing as little stuff with you as possible. I brought:
1 x pair of trekking pants
1 x pair of shoes
1 x pair of thongs
1 x pair of socks
2 x underwear
1 x tshirt
1 x long sleeve tshirt
1 x set of winter pyjamas (not needed as lots of blankets provided)
1 x sunglasses
1 x deodorant
1 x towel
1 x sunscreen
1 x phone + charger
Random crap in my day pack (like wallet and passport)
1 x small daypack
That’s it. Your clothes will get dirty in the Colca Canyon because it’s so dry and dusty, but if you had to bring a clean change of clothes with you for every single day, you’d end up carrying 5kg more than I did and I just don’t think the extra weight is worth it. Just go a little dirty for a couple of days and have a good old shower every night. It’s fine.
Costs
The cost of visiting the Colca Canyon independently vs with a tour is something most people consider. And honestly, it’s probably similar in terms of cost going with a tour (maybe slightly more expensive). We saw a two day tour for 150 soles which included pretty much everything except the national park entry fee & water. Here is what we paid per person for 3 days/2 nights:
Bus Arequipa – Cabanaconde: 17 soles
Bus Cabanaconde – Arequipa: 17 soles
Cab hostel – Arequipa bus station: 3.5 soles
Cab Arequipa bus station – hostel: 3.5 soles
Bus Llahuar – Cabanaconde: 10 soles
Accommodation @ Roy’s in San Juan: 20 soles
Accommodation @ Llahuar Lodge: 20 soles
Meals @ Roy’s: 25 soles
Meals @ Llahuar Lodge: 18 soles
Water: 14 soles
Lunch @ Malata on day 2: 8 soles
Breakfast on day 1 in Cabanaconde: 8 soles
National park entry fee: 40 soles (should have been 70 but they sold us a Latino ticket)
Total: 204 soles
Total minus water & park entry to equate with tour: 150 soles
So if you do things like we did, you will basically get a 3 day trip to Colca Canyon for 150 soles per person.
So it’s absolutely clear. You do not need to buy a tour to visit Colca Canyon. In fact, I’d recommend against taking a tour. That way you’ll have the ultimate flexibility to see the valley the way you want and will avoid the worst of what mass tourism has to offer.
Colca Canyon is one of my favourite places in Peru. Let me know in the comments if you need more info!
After visiting Medellin, Cartagena and Bogota it was time to leave the cities behind and check out some of the villages of Colombia. And Salento was the perfect choice. Here’s what we did in two days.
Day 1 – Visiting the Coffee Farms of Salento
Salento is a famous coffee growing area and it’s possible to visit the farms to see the process from growing to roasting. While a couple of places sell tours to these farms, it’s easy enough to walk to them from Salento and that’s exactly what we did.The two farms which are most advertised are El Ocaso and Don Elias. El Ocaso is the main one people go to as it’s the one most set up for the tourist trade and even has a guesthouse on site. Always looking for something a little different, we chose Don Elias which is a family run organic coffee farm. Simply walk 5km to the west of town down Carrera 5 and you will reach the farm. It’s actually just past El Ocaso and you will see signs all along the way so you’ll know you’re on the right road. The views along this road are excellent and it is such a pleasant walk!
Upon reaching the farm you pay your 6,000 pesos and the young English speaking guy will take you around the farm for 20 minutes showing you the organic coffee process from growing to roasting. You’ll even get to taste the coffee.When you’re done at the coffee farm, you can either walk back the way you came or walk up the driveway of El Ocaso and just before you enter their main compound, follow their fenceline on the right. Don’t turn down the road on the right. Just follow their fenceline down to the river and across the bridge. After crossing the bridge, turn right and follow that road along the river all the way to the main road. From here you can flag down a bus back into Salento. All in all a great day out. Some people also continue from the main road until a waterfall in the hills (Cascada Santa Rita), but that was way too much for us.
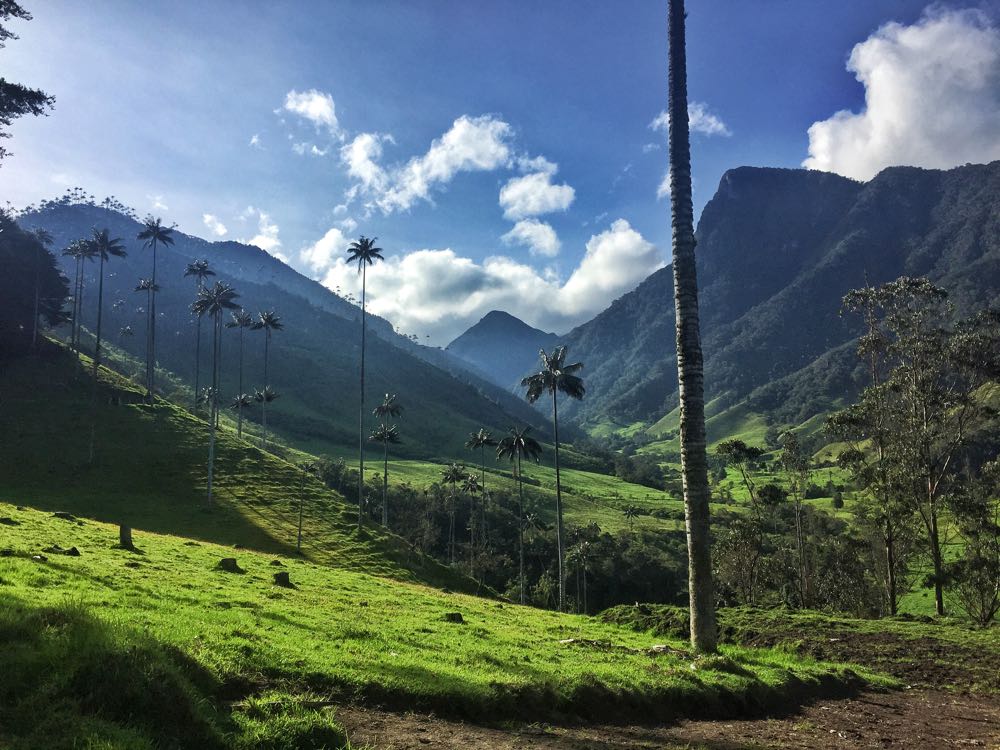
Day 2 – Hiking the Cocora Valley
The Cocora Valley is a highlight of many people’s visit to the area and we have to agree that it’s pretty awesome. Again, tour agents in town sell tours of the valley, but you can easily do it independently.
First of all, catch a collectivo jeep from the main square (there is a woman there selling tickets). You’ll be dropped off next to a big gate with a sign. Most people enter through this gate and begin their loop this way. We chose to walk past the gate straight into the Cocora Valley itself thus doing the loop the opposite way to most people.After about 1km, there is a small farm gate with a guy sitting under a sun shade. Enter here. From here you will pay the guy, start climbing up out of the valley and get great views of the spectacular trees. We initially missed this turn off and ended up 1km down the road and next to a river — wrong turn!
The going is tough and you will be climbing steadily up go about 2800m. The altitude definitely makes things more difficult even if you’re already acclimatised like we were. After a few hours you will reach a national park hut with a couple of dogs. It’s here where you’ll rest and maybe even have a bite to each from the food you brought with you. Hint: Bring food and drinks with you!After a rest, start your descent. At this time you will meet other trekkers coming the other way. Keeping trekking until you reach a fork in the path and turn left (there is a sign). This path through the forest leads to the hummingbird sanctuary called Acaime. After a 20 minute walk you’ll reach the sanctuary, pay your 5,000 pesos entry fee and receive a cup of hot chocolate. The hummingbirds are awesome to watch and we actually spent about an hour there photographing them and eating our lunch.After the hummingbirds, take the same path back but instead of heading back up hill at the fork, continue along the river, crossing numerous bridges. This part of the walk dragged on and on for us and took about 2 hours.
Finally, you reach the entrance gate at the main road and wait for a return jeep to Salento. A punishing yet highly rewarding day out. Definitely do it on your own and definitely ask for a map from you guesthouse. It’s actually not complicated at all.
While in town, we also recommend having coffee at Jesus Martin. Easily the best coffee in town.Apart from that, there’s not a whole lot else to do in town except wander around and enjoy the small town vibe. We loved it and I hope you do too!
I’d already booked tickets to Iceland with Wow Air when I decided to look for a flight to take us to Poland. Cheaply. And it didn’t take long before I stumbled across a Wizz Air flight to the northern Polish city of Gdansk.
Wizz Air is a super budget carrier based in Romania. They’re the type of airline which models itself after Ryan Air where custom service is priory number 700 and stinging you on extra fees is priority number 1. Knowing this, I planned our flights accordingly and booked appropriate baggage including paying to upgrade hand luggage (you only get 5kg as standard) and ensured that our boarding passes were printed before we arrived at the airport.
Checkin for Wizz Air was fast. The line wasn’t too short anyway, but the 3 staff burned through check in no time. Staff weighed the checked in luggage, but didn’t weigh our hand luggage.
Despite being the middle of the Icelandic winter and there being a lot of spare aerobridges, Wizz Air chose to bus its passengers to the aircraft.
Once on board, it felt almost like a party flight with a large portion of the passengers loud and all the overhead lockers chocked full of stuff. Legroom was surprisingly good and my knees weren’t jammed into the seat in front. Far better than Wow Air anyway.
The food service on board is not too bad. Prices are around €2 for a soft drink, €5 for a sandwich. When coming from Iceland, prices like that seem cheap.
Aside from the strange mood of the passengers, everything on board was fine. We arrived slightly before our scheduled arrival time in Gdansk and picked our luggage up without any hassle.
Tips:
Make sure you checkin AND print your boarding pass before arriving at the airport. There is a €30 “fee” (it’s basically theft) per passenger if you need them to print your boarding pass out.
Check the luggage policy for your flight as they charge a fortune if they catch you with an overweight bag. For our flight you got 1x5kg piece of hand luggage for free. This includes handbags and laptop bags! Almost everyone will need to buy extra luggage.
Bring your own food on board to save cash — they don’t seem to care and everyone else was doing it.
Flying from Europe to the USA has always been one of those things you only do once per decade due to the prohibitive cost of flights and until recently, only full service carriers flew the route. But with the advent of airlines such as WOW Air out of Iceland, flying between Europe and the USA doesn’t have to expensive anymore.
I recently flew Norwegian Airlines from Oslo (OSL) to Los Angeles (LAX) in one of their brand new Boeing 787 Dreamliners and learned that cheap doesn’t have to be nasty.
I bought my wife’s ticket for this flight 3 months before departure for a mere €186 (US$205). She has a perfectly sized carry on bag and because Norwegian are so generous with their hand luggage weights, it easily fit within the cabin baggage limits.
I on the other hand have a beast of a backpack which always has to be checked. And on Norwegian, this is the beginning of where you get stung. I bought my ticket 2 months before departure for €265 (US$296) which is still an absolute bargain. This included a €33 (US$37) fee for checked baggage. They also offer free meals onboard for an extra €33 (US$37) and seat selection for a further €33 (US$37)??? You can bundle these 3 addons for an extra fee of €66 (US$74) which is a little steep in my view. In the end, I chose not to preorder meals or seating and everything worked out fine.
Norwegian Airlines Boeing 787
By now, everyone knows that the Boeing 787 is a state of the art aircraft with large windows which don’t have window shades – rather, adjustable dimmers.But the problem with the 787 is that airlines love to pack passengers in like sardines even more than they usually do. The legroom I had was more than adequate and I’m 5″11′ (181cm). But it’s the fact that airlines including Norwegian insist on a 9 abreast seating configuration when 8 abreast is ideal for economy cabins. The means seats and arm rests are extremely narrow. I’m a normal sized guy. Maybe on the light side of things. But when I sit next to another man on a 787, my shoulders touch his. This is torture on long haul because you’re constantly fighting for shoulder space. Luckily for me on this flight to LAX, the guy next to me was short with narrow shoulders. I actually felt comfortable for the entire flight! But your luck certainly can vary. If you’re next to a big person or you yourself are big, this will be a nightmare flight.Each seat has an entertainment unit which also serves as your online shop for the snack bar.
There was a reasonable selection of recent movies as well as documentaries, TV shows and classic movies. The games selection is as it is on every other airline these days. Sudoku, backgammon and chess.But the interesting part about the entertainment system is the snack bar. You simple scroll through the list of items they have for sale, pick what you want and scan your credit card. About 5 minutes later a hostess will deliver your order to your seat. I’m sure they get lots of orders this way.
You can even keep track of all your orders during the flight.
The selection of snacks went way beyond what I had expect and prices weren’t too bad and certainly cheaper than much of what’s available in Oslo airport. Tip: eat on the plane, not at Oslo Airport.
A large selection of spirits, liqueurs and wines are available plus some beers, soft drinks and water. As a general rule, non-alcoholic drinks (330ml) were US$3.50, spirits (50ml) US$8, beer (330ml) US$6, coffee/tea US$4 and wine (187ml) US$7. That’s pretty reasonable in my book. Of course if you want to get smashed on the plane, it’s going to cost you a lot.Snacks included muffins for US$4, Pringles US$3.50, hot snacks (like a panini) for US$7, vegetarian sandwiches US$7, chocolate bar US$2.50, salad US$9 and noodle pot for US$4. Again, not cheap, but not so bad if you got a great deal on the flight. And besides, if you want cheap, you simply bring your own food and don’t buy theirs.
And on that note, I wanted to comment on how much food you’re going to need for this 10hour flight. For two people, I brought along with me 2 massive sandwiches, a packet of chips, a block of chocolate, 2 cheese rolls, 2 apple pies, a bottle of water, 2 bananas and a muffin. Let me tell you, it was enough. I could have left off the apple pies and cheese rolls and had been fine. But we ate them anyway so we didn’t have to declare them on arrival at LAX.One last comment on the aircraft itself. I don’t think there are enough toilets onboard. There was a line for the toilets for the entire flight. The red light indicating the toilets were occupied never went green. It’s really odd because I’d never seen that before. Ah well, if you’re desperate, you just have to wait 15 minutes in line. And maybe you need to stretch your legs anyway.
The flight touched down in LAX on time and without and dramas. Truth be told, this flight was so much more enjoyable than I had expected. We got seated together even though we didn’t pay for seats. We were never hungry despite not paying for meals. And our hand luggage had no trouble getting on board because of the Norwegian hang luggage limit of 10kg plus a small handbag or laptop bag.
So while long haul low cost carriers such as Air Asia can be a nightmare, Norwegian Air really show everyone how it should be done. I’d happily fly them again if the price discount was big enough compared to full service carriers. Because at the end of the day, many full service carriers feel almost the same once on board. Especially so called 5 star carriers such as Qatar who I also flew recently and who also have a 9 abreast seating configuration on Boeing 787s.
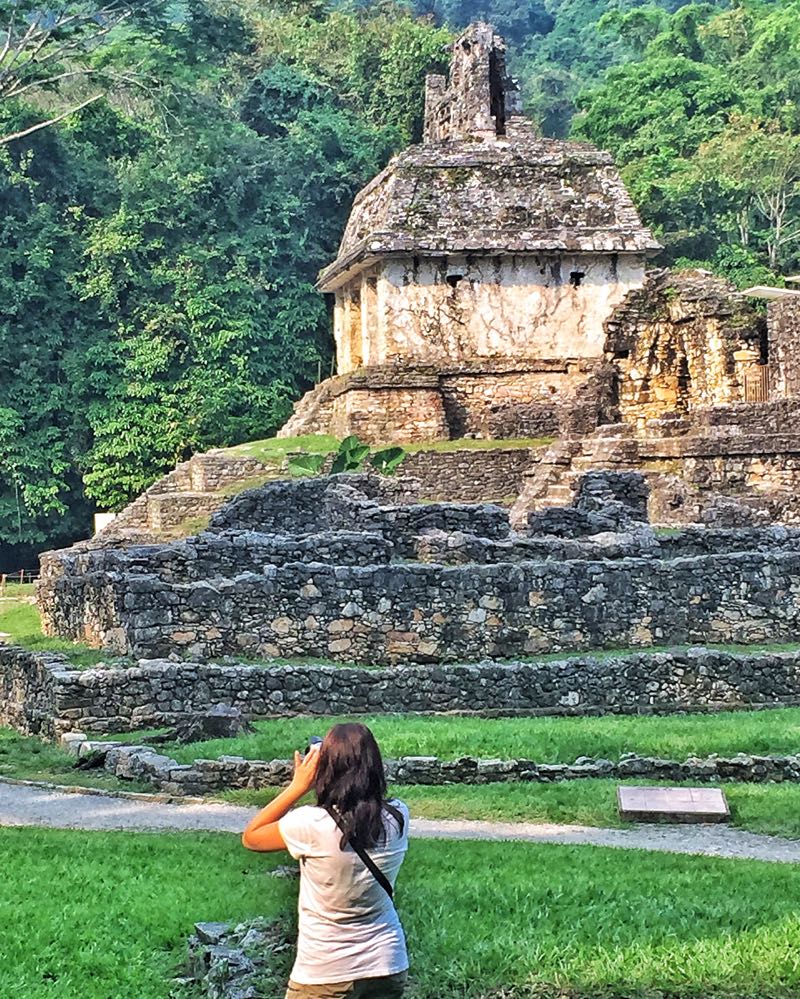
After recently visiting the stunning Mayan ruins of Palenque and the nearby waterfalls of Agua Azul, I just knew I had to share about how I got there, where I stayed (and why) and about a separate activity, Agua Azul.
First of all, it is possible to visit the ruins and Agua Azul in one day. I did it and it wasn’t too rushed, although you need to start early.
How to get to the Mayan Ruins of Palenque
When you exit the main bus station in Palenque (this is where you will arrive by bus), you will see a roundabout which leads in a bunch of directions. For the purposes of this post, the main road in Palenque refers to the road which runs directly away from the bus terminal. Collectivos (shared minivans) come down this main road looking for passengers and one will find you as you set off at about 8am. So just wait anywhere along this road and a van will stop and ask if you’re going to “ruinas”. If you really want to be certain, just look at the sign in the window which also says “ruinas”. But seriously, they’re so desperate for passengers that they will find you. They’ll pick you up, maybe do a lap of the town and then head straight to the ruins.First stop is to pay the National Park entry fee which is MX$65. Get back on the same collectivo and you will be taken to the ticket office for the ruins (there is one ticket booth for the national park and one for the ruins in separate locations). Pay the driver MX$20 per person for his services and get on your way.
After buying your entry ticket for MX$65 (this is the second entry fee — 65 for ruins + 65 for national park), you can enter the ruins area. I read one post which said you can spin through it in an hour. And while that’s true, you will be missing a lot of the ruins because some of them are a fair hike up and down lots of steps. I think it took me about 2 hours and I was done by then. Collectivos returning to town are waiting where they dropped you off. Just hop on one and it will leave within 5 minutes and drop you wherever you want along the main road in Palenque.
How to get to Agua Azul
Because at this stage it’s just before midday, it’s a good opportunity to grab a quick bite to eat in Palenque itself. I thought Las Tinajas was good. Massive portions big enough to share between 2 people. Seriously. After this, head back down the main road and look for the collectivo station. You’ll notice a bunch of collectivos, a bunch of guys and lots of offers of collectivos to places like Agua Azul. Pick one guy (there are different operators), pay your MX$40, hop on the collectivo and wait for it to fill up with other passengers. The ride out to Agua Azul takes about an hour and a half along a road known for banditry at night. In the daytime it seemed pretty normal and safe.You’ll be dropped off at the turn off to Agua Azul where there are pickup trucks waiting to take you to the entrance. Pickup trucks are MX$20 per person which is a ripoff, but walking isn’t really an option unless you arrive really early in the day, have heaps of time and no money. Entry to the waterfall is MX$40. The waterfall is a stunning blue and it’s worth having a dip in the pristine waters. Sadly, much of the area is off limits for reasons unknown, but rumoured to be related to safety.
Getting back to Palenque is exactly the opposite of what you just did. Pickup back to the top, wait for a collectivo to pass by and you’re on your way.
It’s actually worthwhile doing this as a one day trip if you don’t have that much time and don’t intend to spend hour upon hour at the ruins. That way you can catch the night bus from Palenque to some place like Tulum, Playa Del Carmen or Cancun. It all matches up quite nicely.
Accommodation in Palenque
One of the big decisions when in Palenque is to toss up between staying in the jungle near the ruins or staying in town. I decided to stay in town. Initially I had wanted to stay in the jungle because it’s cheaper and more towards my style of accommodation — something a little unique. But I read online story after story of countless hippies with bongo drums partying the night away. If you’re not a hippie, you are going to hate that. Nothing worse than a drum circle when you’re on the outside of it. Pretty sure there would have been fire twirlers, hoola hoops, lots of festy hair and plenty of weed.
I stayed at Hotel Maya Rue which was pretty expensive really. Most of the hotels in town are. But I think it’s a better option to stay in town. Especially because you then have a wide range of food choices which are miles cheaper than the monopoly in the forest. So yeah, you spend more on accommodation, less on food. Works out pretty similar in the end, especially if your hotels gives a free brekky.
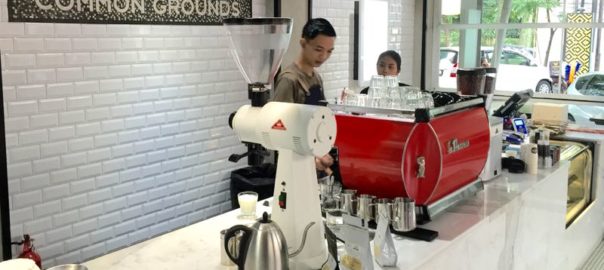
And the great cafes in Bandung keep springing up. This time, it’s Common Grounds. Common Grounds originated in Jakarta and became an instant success. I went there when it first opened and to be honest, the food offering was poor. But on subsequent visits, they’ve refined their service to the point that I think it’s a fantastic place to go and have brunch and a couple of coffees.
Which brings us to Bandung. I guess the main thing to question is whether Common Grounds Bandung lives up to its successful sibling in Jakarta. And for me, it does. Actually, I prefer the Bandung branch because the fitout is so freaking awesome whereas the Jakarta version is in a crappy old mall.
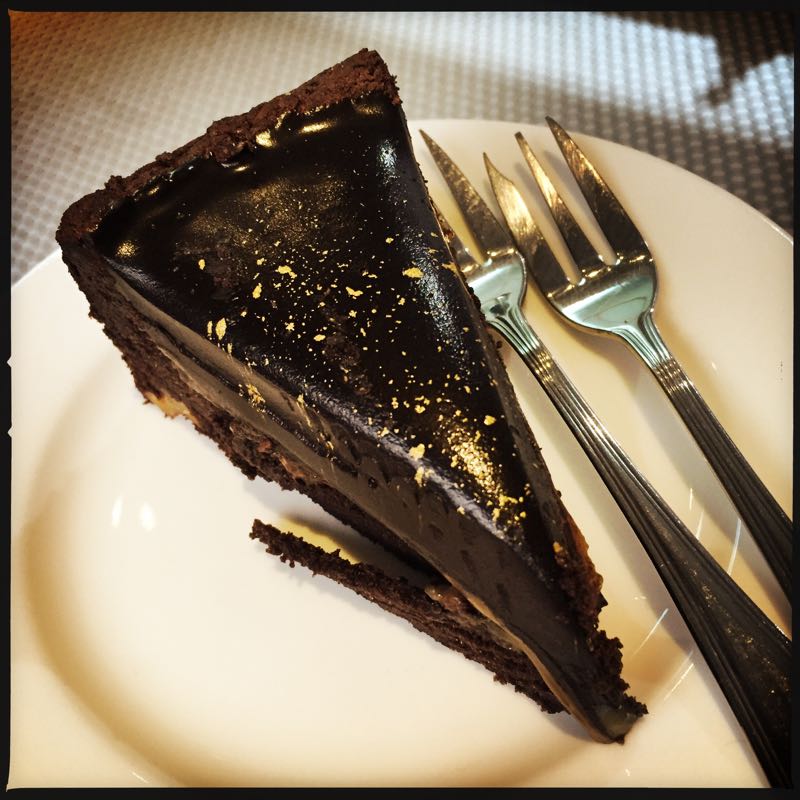
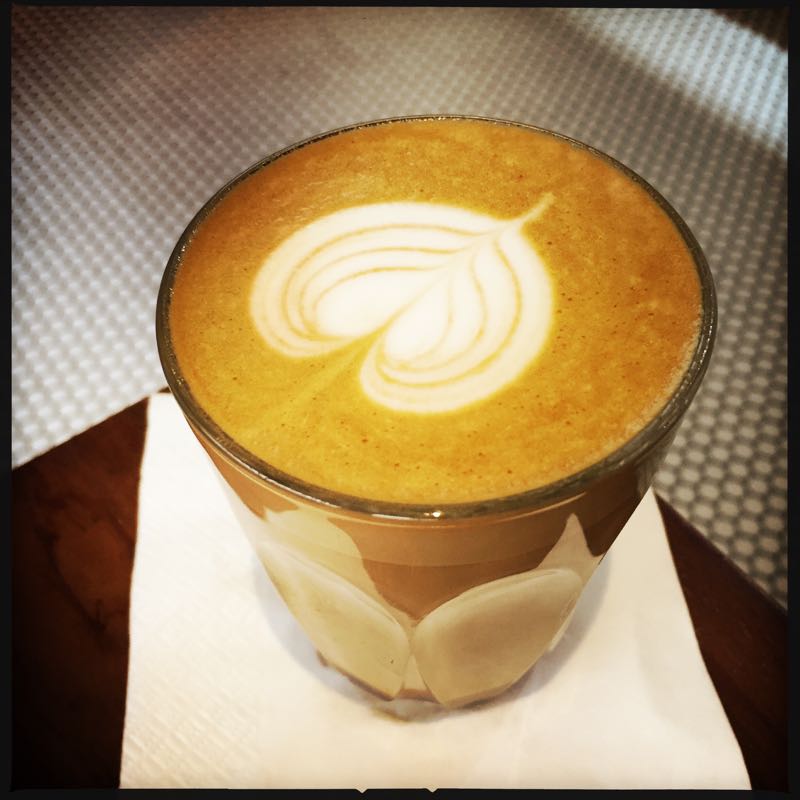
The coffee at Common Grounds is first rate. Equal to the best in Bandung, but to be honest, there are so many great coffee places in Bandung now that this level is the minimum required in my view. I expect excellent coffee in every cafe I go to and Common Grounds Bandung does deliver. Next is food. The menu here is diverse and includes the usual brunch style items such as pancakes but also heavier savoury things such as burgers and baked eggs. The cake selection is small, but the chocolate souffle cake I tried was awesome. So over-the-top rich, but I liked that. Apparently they ship the cakes in from Jakarta rather than make them in house, but I think that’s OK as long as the taste is good. And anyway, the souffle cake I tried was nothing like a souffle… Not sure what that is about.
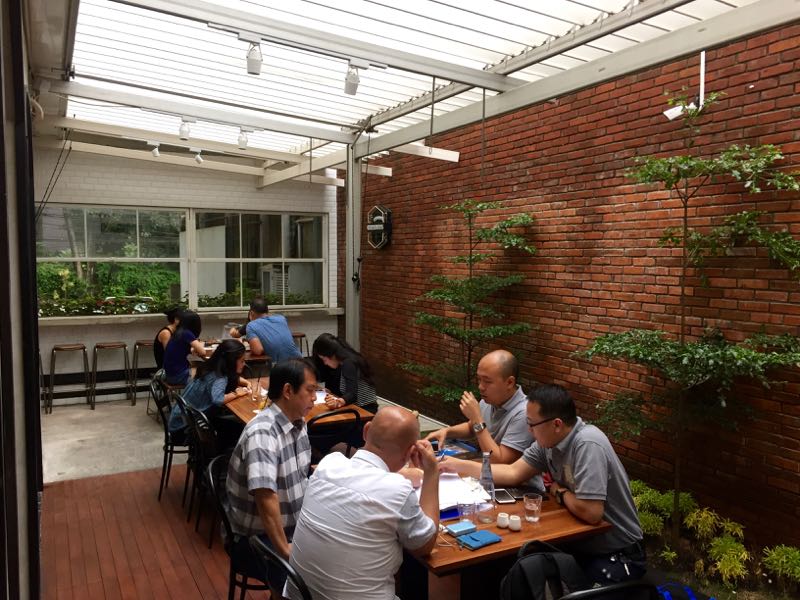
Next, we turn to whether this place is suitable for working from. One of the biggest gripes I have in all of Bandung (aside from the traffic) is the lack of decent work spaces in cafes. Mainly the issue is to do with WiFi. Indonesia does have super fast wifi in many areas. Bandung has it throughout the city. I even have quite fast wifi at home. The problem is that in most cafes the connections are usually shit and Common Grounds is no different. For me, they shouldn’t bother offering wifi at all if they can’t give you something that is even barely usable. With a cafe filled with about 10 people, the internet worked about 25% of the time. And even at those times it was on and off. In other words, completely frustrating and better off if they didn’t have it. This is pretty similar to most cafes in Bandung, to be fair. I don’t know why it’s always so bad, but it needs to be fixed.
One last point is about pricing and it’s something that raises its head time and time again in Indonesia. It’s the issue of charging for an extra shot of coffee. Now some places such as two hands full don’t charge for an extra shot as the coffees come standard with 2 shots. Noah’s Barn does a magic which has 2 shots for 28k plus tax. But I’ve been charged up to 60k in the past for double shot coffees as they often charge for 2 separate coffees. Common Grounds doesn’t do this. But the do charge 10k plus tax and service for an extra shot which probably costs them 2k in beans, absolutely nothing in labour and saves them probably 500 in milk. It’s a rip off. So yeah, I would be OK with an extra 5k, and even then the total price of the coffee would be 37k plus tax. But as it stands, I’ve to pay 47k for that double shot coffee which by world standards is a rip off. By Bandung standards it’s criminal.
So the final verdict? Awesome. One of my new favourite cafes in Bandung. Just don’t go there expecting to use the wifi.
Back in November there was this crazy sale on Qatar Airways where you could get an open jaw ticket for and incredible price. All you had to do was start your journey in Malaysia, end it in Jakarta and enter Europe through one city and return via another. We had no plans to go to Europe, but when we plugged in some dates to the website, we couldn’t believe the price. US$350 for the entire trip inclusive of all taxes and fees — we just had to buy it.
Our flight was from Kuala Lumpur to Copenhagen with a 2h30m transit in Doha. Both flights used brand new Boeing 787 dreamliners and it was our first time flying in them. While most aspects of the two flights were great, the planes themselves were substandard for a full service for reasons we’ll get to in a moment. First, the inflight service.
On each flight we were offered package refresher towels not long after take off and the meal service started soon after. The food out of Kuala Lumpur was below average for a full service carrier, but quite good out of Doha. A second fairly heavy snack was served out of Kuala Lumpur and a light snack served out of Doha. Both meals out of Doha were far far better than out of KL.
Drinks were offered several times throughout both flights, staff were very friendly and attentive and the overall level of service was good.
For those of you who haven’t flown on a Dreamliner, the windows are the star of the plane. No window shades — just this dimmer function which can create an incredibly dark cabin electronically.
The seat configuration in economy on Qatar 787s is 3-3-3 and it should be outlawed. The seats are extremely narrow to the point where my body was twisted sideways for 7 hours straight out of KL because I was next to another man. Not a big man. Just a man. And because men often have broad shoulders, it means there is not enough room if two normal sized men sit next to each other. There was no fight for the armrest — we were fighting to see whose arm could be on top of whose. We weren’t just rubbing shoulders, our shoulders were overlapping at times. Eating a meal like this is very difficult. I would hate think how it would be with two bigger people sitting next to each other.
Aside from the narrowness of the seats, I also found them to be very close together when the person in front reclines their seat. You always get up personal when this happens in economy, but this flight felt more like Air Asia in this regard than any other full service carrier I’ve flown on.
The positives were the entertainment unit which has a large sharp screen, USB port and lots of movies. Each seat also comes with a power socket, but there’s no way you’ll be working on a laptop — there’s just not enough room unless you’re lucky enough to have no one sitting next to you.
So what’s the verdict? If I’d paid US$1000 for these flights, I’d be disappointed at being crammed into the the seats like we were. But given that we only paid US$350, I just can’t complain.
But we learned a lesson. Do not fly on a Boeing 787 if it’s fitted with a 3-3-3 configuration. It’s just too uncomfortable for a long haul flight.


 The best idea is to rent a motorbike to get around on, but if you’re not interested in riding a motorbike, there are plenty of cars and drivers available from the hotels.


 We bought a lot of food for this trek and it ended up being way way too much. For some unknown reason, we just didn’t eat as much as we normally would and we brought too much emergency food. This weighed us down a lot!
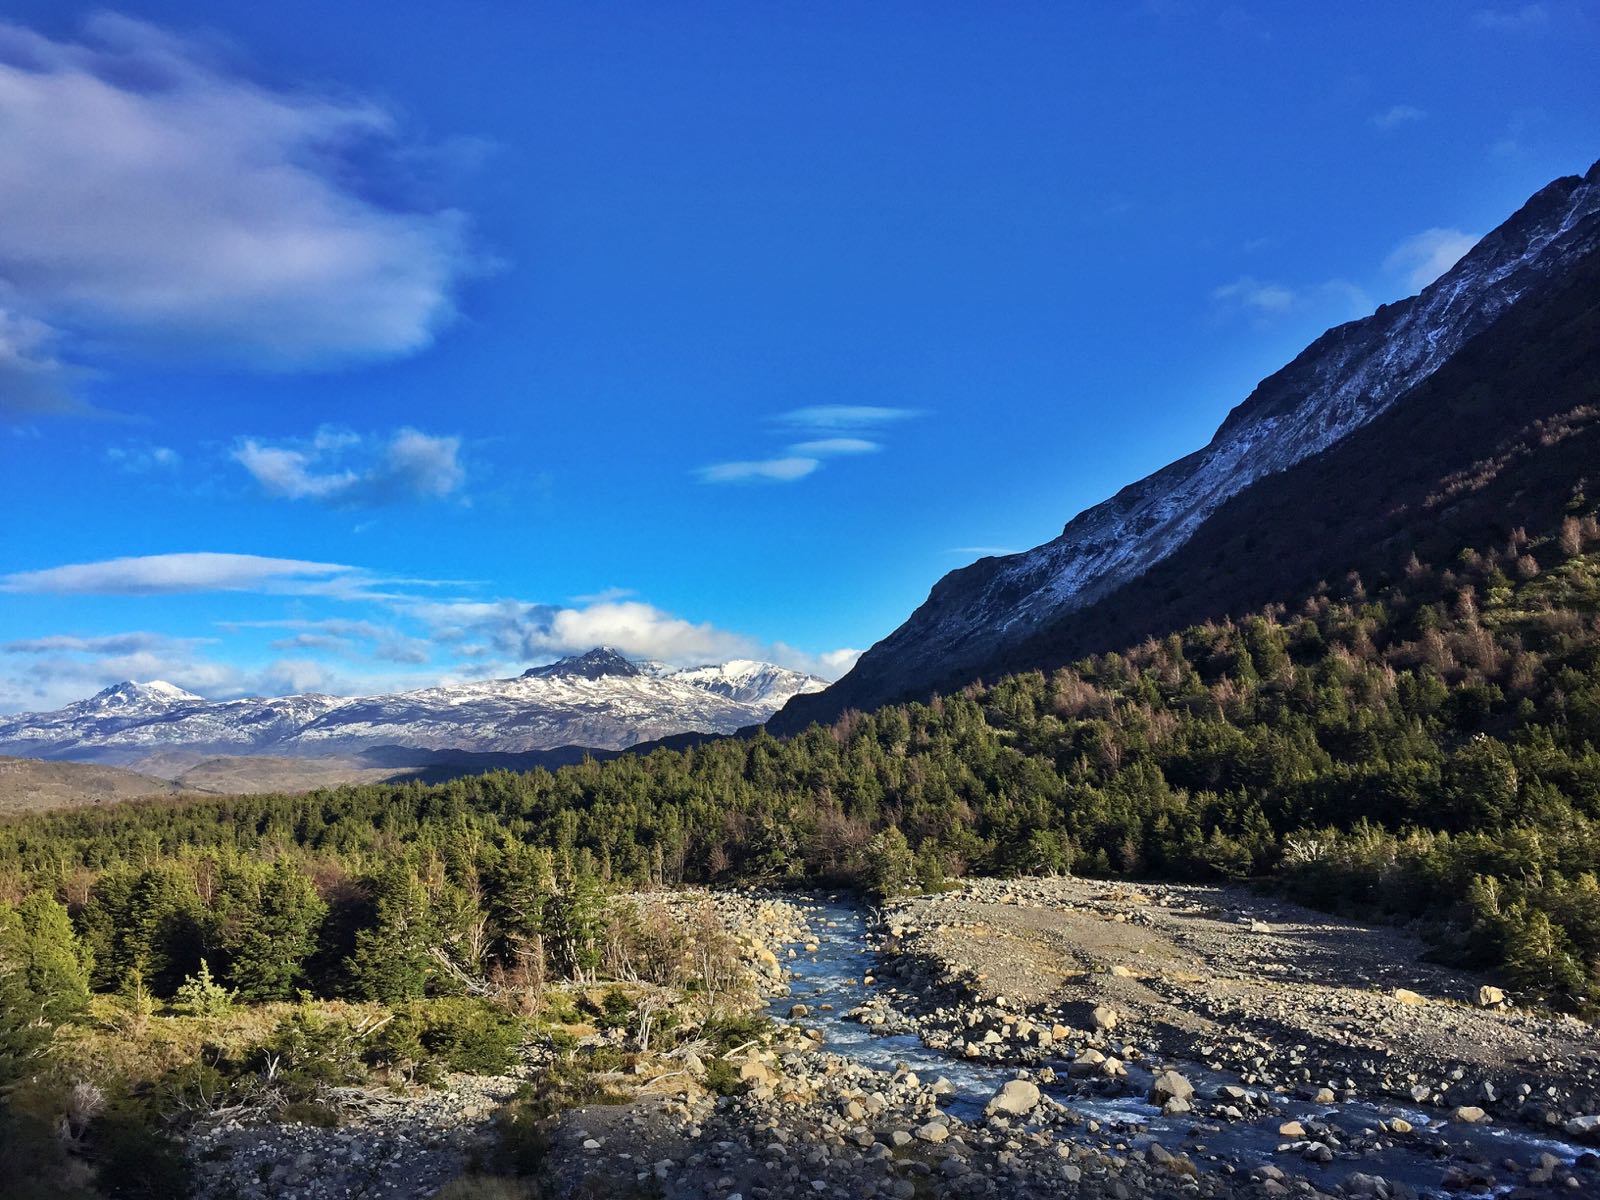
 Within 10 minutes it started raining lightly. Within half an hour it was really windy. Actually windier than I’ve ever experienced before so we could guess it was gusting well over 100km/h. This wind combined with the rain combined with a temperature of about 2°C was awful. Our pants were immediately soaked and our legs like blocks of ice. But we had to keep walking in that incredible headwind even as it almost blew us over numerous times.
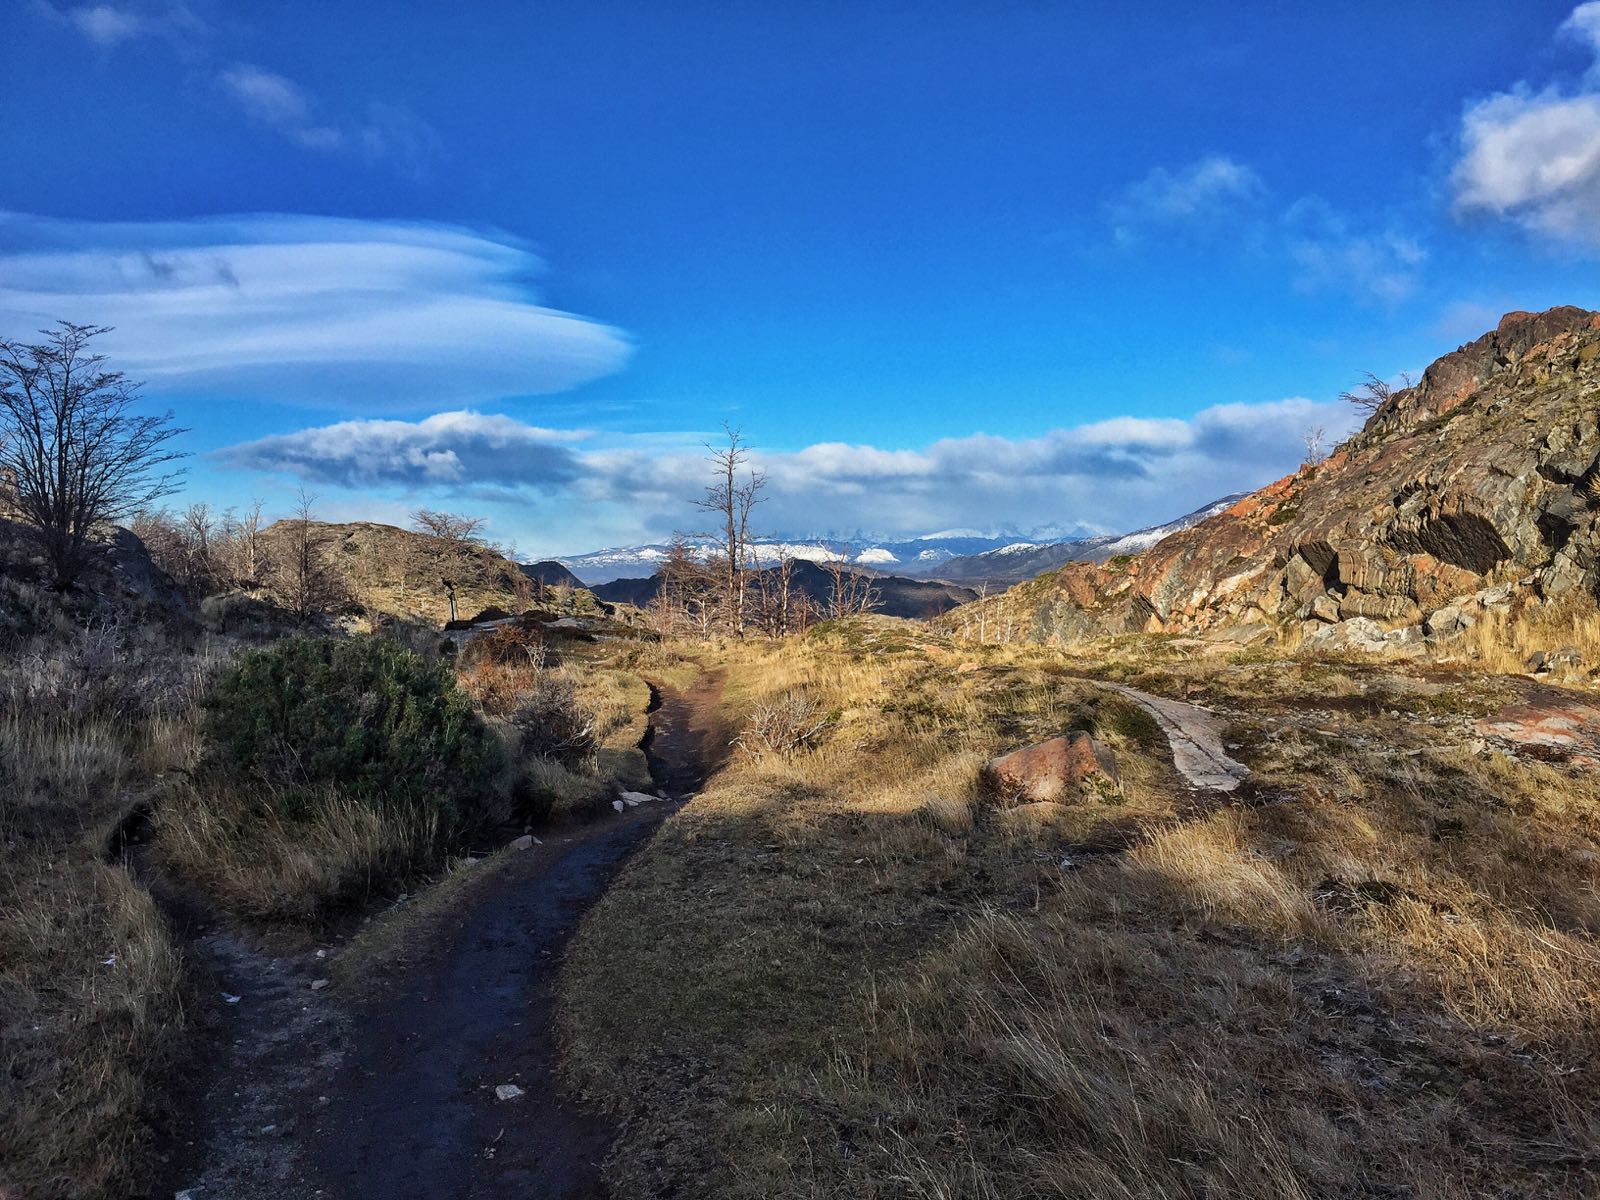 We decided to walk up to Mirador Glacier Grey, a 4 hour round trip. The wind was strong again, but because there was no rain and we weren’t carrying our big packs, it was really easy to do and a perfect tonic for the previous day’s misery.
 From there we headed back to Italiano, ate some lunch and progressed onto Cuernos. I’d never set up a tent on a wooden platform before, so that was a learning experience. I just did what everyone else before me had done and placed big rocks inside the tent in the corners to keep it from flying away. It wasn’t that windy there anyway.
 At this point we stopped and talked about our plan. It seemed that we wouldn’t have enough time that day to reach the towers because we were running out of light. We also knew we wouldn’t be able to wake up the next morning, hike to the towers and then all the way back down to Amarga to catch the bus. In the end, we decided to descend out of the snow and back to Chileno.
 Susan hunted down the chef again and asked if we could come inside. He instead opened up his kitchen for us, turned on the gas stove and gave us access to water. Within a couple of hours it was reasonably warm in there to the point we could take our jackets off. Big thanks to the chef at Chileno.
 We commenced our trek down from Chileno to Laguna Amarga which was quite muddy by this time.
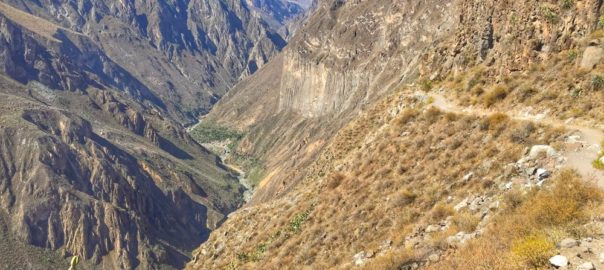

 So the second option is to do it all in your own. When you visit the Colca Canyon independently, you allow yourself to pick and choose the villages to visit based on what you want to see, how tired you are and other recommendations you might get while on the trail. It is slightly cheaper to do it independently, but the freedom you get is by far the biggest benefit. And honestly, it is not complicated to do on your own. The main thing people worry about is how to get to Colca Canyon.
 Buses at the time of writing depart Arequipa for Cabanaconde at 1am, 3:30am, 9:30am, 11am, 3pm and 7pm. The journey takes 6 hours, so you need to select a bus that will get you to Cabanaconde at a time that is suitable for you. If you want to trek immediately after arriving like we did, you have to catch the 3:30am bus because the 9:30am bus arrives too late to be able to trek to the bottom of the valley before it gets dark. We met a lot of people who caught the bus from Arequipa and stayed overnight in Cabanaconde first and this is a good idea if you have a lot of time.
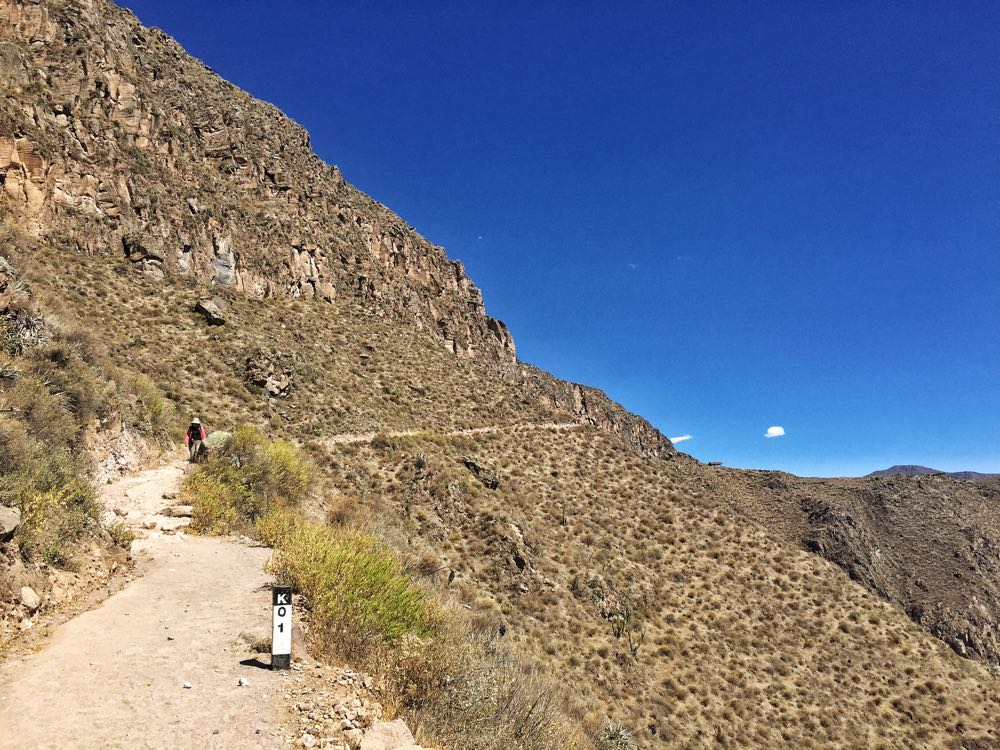 After Llahuar, most trekkers we met either tried to go to Fure, an abandoned village with no guarantee of accommodation or the oasis town of Sangalle. Some people we met did trek all the way to Tapay as well and we think this is a great idea because Tapay doesn’t get so many visitors. It’s a long trek to Tapay from Llahuar, so allow about 8 hours inclusive of a stop for lunch at Malata. San Juan is 7 hours or slightly less if you’re fast. Sangalle is 5 hours or slightly less if you’re fast, but doesn’t include a stop for lunch because you actually bypass Malata.
 From Roy’s (9am) we climbed for a couple of hours up to Cosñirhua and then along the flat road to Malata (11:13am) where we ate a fantastic but simple lunch at a random shop. At 12pm we continued our walk towards Llahuar and we basically didn’t stop walking for the next 4 hours until 4pm. In all it took us 7 hours from San Juan to Llahuar and it was honestly quite brutal. Lots of uphill at the start and lots of downhill at the end. The middle section was only a slight uphill, but it was in the blistering sun, so it just sapped all our energy. Thankfully the hot springs at Llahuar were totally worth it.
 The two farms which are most advertised are El Ocaso and Don Elias. El Ocaso is the main one people go to as it’s the one most set up for the tourist trade and even has a guesthouse on site. Always looking for something a little different, we chose Don Elias which is a family run organic coffee farm. Simply walk 5km to the west of town down Carrera 5 and you will reach the farm. It’s actually just past El Ocaso and you will see signs all along the way so you’ll know you’re on the right road. The views along this road are excellent and it is such a pleasant walk!
 When you’re done at the coffee farm, you can either walk back the way you came or walk up the driveway of El Ocaso and just before you enter their main compound, follow their fenceline on the right. Don’t turn down the road on the right. Just follow their fenceline down to the river and across the bridge. After crossing the bridge, turn right and follow that road along the river all the way to the main road. From here you can flag down a bus back into Salento. All in all a great day out. Some people also continue from the main road until a waterfall in the hills (Cascada Santa Rita), but that was way too much for us.
 After about 1km, there is a small farm gate with a guy sitting under a sun shade. Enter here. From here you will pay the guy, start climbing up out of the valley and get great views of the spectacular trees. We initially missed this turn off and ended up 1km down the road and next to a river — wrong turn!
 After a rest, start your descent. At this time you will meet other trekkers coming the other way. Keeping trekking until you reach a fork in the path and turn left (there is a sign). This path through the forest leads to the hummingbird sanctuary called Acaime. After a 20 minute walk you’ll reach the sanctuary, pay your 5,000 pesos entry fee and receive a cup of hot chocolate. The hummingbirds are awesome to watch and we actually spent about an hour there photographing them and eating our lunch.
 After the hummingbirds, take the same path back but instead of heading back up hill at the fork, continue along the river, crossing numerous bridges. This part of the walk dragged on and on for us and took about 2 hours.
 Apart from that, there’s not a whole lot else to do in town except wander around and enjoy the small town vibe. We loved it and I hope you do too!
 But the problem with the 787 is that airlines love to pack passengers in like sardines even more than they usually do. The legroom I had was more than adequate and I’m 5″11′ (181cm). But it’s the fact that airlines including Norwegian insist on a 9 abreast seating configuration when 8 abreast is ideal for economy cabins. The means seats and arm rests are extremely narrow. I’m a normal sized guy. Maybe on the light side of things. But when I sit next to another man on a 787, my shoulders touch his. This is torture on long haul because you’re constantly fighting for shoulder space. Luckily for me on this flight to LAX, the guy next to me was short with narrow shoulders. I actually felt comfortable for the entire flight! But your luck certainly can vary. If you’re next to a big person or you yourself are big, this will be a nightmare flight.
 Each seat has an entertainment unit which also serves as your online shop for the snack bar.
 But the interesting part about the entertainment system is the snack bar. You simple scroll through the list of items they have for sale, pick what you want and scan your credit card. About 5 minutes later a hostess will deliver your order to your seat. I’m sure they get lots of orders this way.
 Snacks included muffins for US$4, Pringles US$3.50, hot snacks (like a panini) for US$7, vegetarian sandwiches US$7, chocolate bar US$2.50, salad US$9 and noodle pot for US$4. Again, not cheap, but not so bad if you got a great deal on the flight. And besides, if you want cheap, you simply bring your own food and don’t buy theirs.
 One last comment on the aircraft itself. I don’t think there are enough toilets onboard. There was a line for the toilets for the entire flight. The red light indicating the toilets were occupied never went green. It’s really odd because I’d never seen that before. Ah well, if you’re desperate, you just have to wait 15 minutes in line. And maybe you need to stretch your legs anyway.
 First stop is to pay the National Park entry fee which is MX$65. Get back on the same collectivo and you will be taken to the ticket office for the ruins (there is one ticket booth for the national park and one for the ruins in separate locations). Pay the driver MX$20 per person for his services and get on your way.
 You’ll be dropped off at the turn off to Agua Azul where there are pickup trucks waiting to take you to the entrance. Pickup trucks are MX$20 per person which is a ripoff, but walking isn’t really an option unless you arrive really early in the day, have heaps of time and no money. Entry to the waterfall is MX$40. The waterfall is a stunning blue and it’s worth having a dip in the pristine waters. Sadly, much of the area is off limits for reasons unknown, but rumoured to be related to safety.